Homelab Documentation Template: README, Inventory, and Runbooks That Stay Usable
Copy a practical homelab documentation template with a front-door README, service inventory, network notes, runbooks, and a change log that stays usable during outages.
A useful homelab documentation template answers five questions quickly: what runs, where it runs, how it connects, how it is backed up, and what to do first when something breaks. The goal is a small, searchable starter system that remains useful during an outage instead of a large taxonomy nobody maintains.
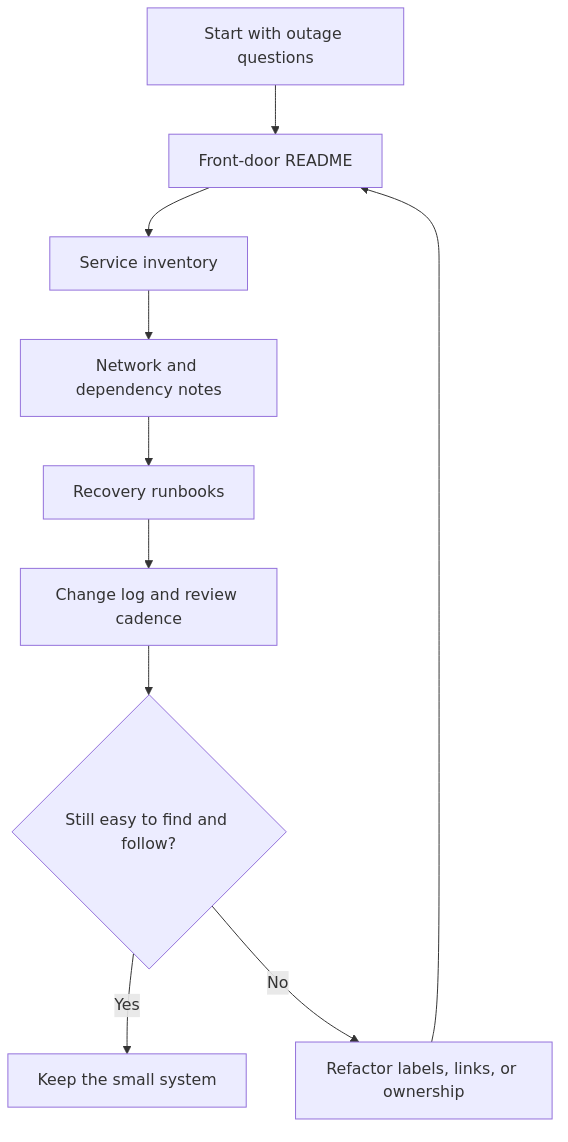
Use the flow below to build the documentation in layers: establish a front-door README, add an inventory, capture network and dependency notes, then write the recovery runbooks that turn notes into action.
Build documentation in layers, then review whether it remains easy to find and follow.
Key Takeaways
Start with a front-door README and a small service inventory before choosing a full documentation platform.
Keep network, dependency, backup, and recovery information close enough to follow during an outage.
Review the system on a cadence; remove stale screenshots, links, and assumptions instead of adding more categories.
Why a documentation template helps more than another tool comparison
Beginners often solve the wrong problem first.
They spend a weekend deciding between BookStack, Wiki.js, Obsidian, or a Git repo, then never actually write the service inventory or restore checklist they needed in the first place.
The tool matters, but structure matters first.
A template gives you three things that most homelab docs are missing:
1. A starting point - you no longer have to invent the first page from scratch.
2. Consistency - every host, service, and procedure follows the same shape.
3. Faster updates - when you know where a note belongs, you are much more likely to add it right after a change.
That is also why this page fits well with the rest of the documentation cluster:
network.md keeps IPs, VLANs, DNS, and gateway details together.
runbooks.md stores step-by-step procedures for recovery and maintenance.
changes.md answers the question, "what changed right before this broke?"
assets/ stops diagrams and screenshots from getting lost in Downloads.
If you have not fixed your naming system yet, do that next with Homelab Naming Conventions and Folder Layout. A strong template helps a lot, but it helps even more when your files and hostnames are predictable.
Where to keep the template
For most beginners, a reasonable choice would be start in one of these places:
transmission signup
article_topic // Homelab Documentation Template
Don't leave without the setup notes.
Get practical homelab guides, failure logs, and beginner-friendly build notes in your inbox.
Enter your email address to receive the Homelab Addiction newsletter.
Weekly only. No spam. Unsubscribe anytime.
Option
Best for
Why it works
Main drawback
Local Markdown folder
One main operator
Fast, simple, works offline
Easy to forget backups if you are sloppy
Git repo with docs/ folder
Operators already using Git
Version history, portable, searchable
Slight learning curve if Git still feels new
BookStack
Shared self-hosted docs
Clean structure and permissions
Your docs depend on another running service
Obsidian vault
Solo operators who want easy note-taking
Very fast writing workflow
Sharing is less natural than a wiki
Wiki.js
Labs growing into team-style docs
Flexible and more portal-like
Slightly more moving parts
A practical default is simple: start with plain Markdown, then move later if needed. The Markdown Guide basic syntax reference is enough to get you moving if you are new to .md files.
Template 1: the front-door README
Your README is the page you should be able to open on your phone while tired and still understand what your lab looks like.
It does not need every detail. It needs the details that help you orient yourself fast.
Copy this starter template:
# Homelab Overview\n\nLast updated: YYYY-MM-DD\nPrimary operator: Your Name\nDocumentation home: homelab-docs/\nCredential storage: Vaultwarden / password manager secure note / physical safe\n\n## Purpose\nShort summary of what this homelab is for.\nExample: Learning Docker, hosting family services, private file sync, ad blocking, and backup practice.\n\n## Core hosts\n| Host | Role | IP / DNS | OS / Platform | Notes |\n| --- | --- | --- | --- | --- |\n| proxmox-office-01 | Hypervisor | 192.168.10.10 | Proxmox VE | Main VM host |\n| nas-office-01 | Storage | 192.168.10.20 | TrueNAS SCALE | Stores backups and media |\n| mini-lab-01 | Docker host | 192.168.10.30 | Ubuntu Server | Runs public-facing containers |\n\n## Critical services\n| Service | URL / Port | Host | Storage | Backup status |\n| --- | --- | --- | --- | --- |\n| Vaultwarden | https://vault.lab.example.com | mini-lab-01 | /srv/vaultwarden | nightly backup |\n| Immich | https://photos.lab.example.com | mini-lab-01 | /srv/immich | nightly backup |\n| Pi-hole | http://192.168.10.40/admin | pi-lab-01 | local SD + config export | weekly config export |\n\n## Recovery priorities\n1. DNS / DHCP\n2. Password manager\n3. Reverse proxy / remote access\n4. Storage and backups\n5. Apps for normal use\n\n## Important references\n- Network details: ./network.md\n- Service inventory: ./services.md\n- Recovery steps: ./runbooks.md\n- Recent changes: ./changes.md
Why this README structure works
It answers the beginner questions that usually come up first:
Which boxes are important?
Which host runs the service I need?
Where do credentials live?
What should come back first after a failure?
If you are still early in the networking side of your lab, pair this with Homelab IP Plan Template so the host table and network notes use the same source of truth.
Template 2: the service inventory page
This is the file that saves you from saying, "an operator cannot remember where a service runs."
A service inventory is exactly what it sounds like: a list of every important app or infrastructure component, plus the facts you always end up needing later.
Copy this layout into services.md:
# Service Inventory\n\n## Service Template\n### Service name\n- Purpose:\n- URL or access method:\n- Host:\n- Container / VM / bare metal:\n- Data path:\n- Config path:\n- Backup method:\n- Dependencies:\n- Exposed to internet?: yes / no\n- Auth method:\n- Last tested:\n- Notes:\n\n## Example\n### Vaultwarden\n- Purpose: Family password manager\n- URL or access method: https://vault.lab.example.com\n- Host: mini-lab-01\n- Container / VM / bare metal: Docker container\n- Data path: /srv/vaultwarden/data\n- Config path: docker-compose.yml in /srv/stacks/vaultwarden\n- Backup method: nightly rsync to nas-office-01 plus weekly restore spot-check\n- Dependencies: Docker, reverse proxy, DNS, TLS certificate, storage mount\n- Exposed to internet?: yes, but only through Cloudflare Tunnel\n- Auth method: Vaultwarden admin + per-user accounts, MFA enabled\n- Last tested: 2026-07-01\n- Notes: Admin token stored in password manager secure note. Service restart command documented in runbooks.md.
Add one short dependency line for every service
This is one of the easiest places to improve your documentation quality.
Do not only document the app itself. Document what has to be working around it.
For example:
Immich depends on storage, database, reverse proxy, and DNS.
Pi-hole depends on the local network, static addressing, and clients actually pointing to it.
A reverse proxy depends on DNS, certificates, and whichever backend app it fronts.
That dependency line becomes very useful during troubleshooting because it tells you where to look next.
Template 3: the network page
This is the page that keeps your IPs, VLANs, gateways, and DNS choices from living in five different places.
You do not need a giant enterprise network document. You need one page that makes your home network easier to understand later.
Start with this:
# Network Notes\n\n## Default LAN\n- Subnet: 192.168.10.0/24\n- Gateway: 192.168.10.1\n- DHCP range: 192.168.10.100-192.168.10.199\n- DNS servers: 192.168.10.40, 1.1.1.1\n- Domain suffix: lab.example.com\n\n## VLANs\n| VLAN ID | Name | Subnet | Purpose | Notes |\n| --- | --- | --- | --- | --- |\n| 10 | main-lan | 192.168.10.0/24 | trusted devices and core servers | default network |\n| 20 | iot | 192.168.20.0/24 | smart home devices | internet only |\n| 30 | guest | 192.168.30.0/24 | guest devices | isolated from lab |\n\n## Static IPs and reservations\n| Device / Service | Address | Method | Reason |\n| --- | --- | --- | --- |\n| proxmox-office-01 | 192.168.10.10 | static | hypervisor should not move |\n| nas-office-01 | 192.168.10.20 | static | storage target for backups |\n| pi-hole | 192.168.10.40 | DHCP reservation | easier router-side management |\n\n## Important firewall or routing notes\n- VLAN 20 cannot initiate connections to VLAN 10\n- Reverse proxy host allowed inbound HTTPS only\n- DNS admin interface limited to trusted clients\n\n## Diagram location\n- Latest network diagram: ./assets/diagrams/network-overview-YYYY-MM-DD.drawio
Why this network template matters
The live router UI is not a documentation system.
It can show you the current state, but it usually does a poor job of explaining why a VLAN exists, why one service is pinned to a specific IP, or which rules are intentional exceptions.
If you want a free, editable diagram tool, diagrams.net is still one of the easiest starting points for homelab network maps.
Template 4: the runbook page
A runbook is just a documented procedure for a task you expect to repeat or a failure you expect to survive.
This is one of the most useful terms for beginners to learn because it shifts documentation away from vague notes and toward action.
A good runbook says:
when to use it
what you need before you start
what to do in order
what success looks like
what to check if it fails
Copy this template into runbooks.md:
# Runbooks\n\n## Runbook template\n### Procedure name\n- Use this when:\n- Risk level: low / medium / high\n- Estimated time:\n- Prerequisites:\n- Last tested:\n\n#### Steps\n1. Step one.\n2. Step two.\n3. Step three.\n\n#### Verification\n- What should be true after the procedure?\n\n#### If it fails\n- First thing to check:\n- Second thing to check:\n- Rollback option:\n\n## Example: Restart a Docker service safely\n### Restart Vaultwarden container\n- Use this when: Vaultwarden is unreachable but host networking and Docker are healthy\n- Risk level: low\n- Estimated time: 5 minutes\n- Prerequisites: SSH access to mini-lab-01, sudo rights, recent backup confirmed\n- Last tested: 2026-07-01\n\n#### Steps\n1. SSH to `mini-lab-01`.\n2. Change to the stack directory: `cd /srv/stacks/vaultwarden`\n3. Check logs: `docker compose logs --tail=100 vaultwarden`\n4. Restart the service: `docker compose restart vaultwarden`\n5. Wait 20-30 seconds.\n6. Test the URL in a browser.\n\n#### Verification\n- Login page loads at `https://vault.lab.example.com`\n- `docker compose ps` shows the container as running\n- Reverse proxy health check passes\n\n#### If it fails\n- First thing to check: database or volume mount errors in logs\n- Second thing to check: reverse proxy routing and DNS\n- Rollback option: restore last known-good compose file and container data from backup
Runbooks beginners should write first
If your lab is small, do not try to document every possible event.
Write these first:
1. Restart a service safely
2. Restore a service from backup
3. Replace a host or move a container
4. Rotate a secret or API token
5. Update reverse proxy or remote access settings
Those five cover a surprising amount of real homelab pain.
A change log is one of the least glamorous and most useful things you can keep.
When something breaks, one of the first questions should be: what changed recently?
If the answer is always, "I do not know, I touched a lot of stuff this week," troubleshooting gets slower immediately.
Use this simple structure in changes.md:
# Change Log\n\n## YYYY-MM-DD\n- Changed:\n- Why:\n- Systems affected:\n- Rollback path:\n- Verified:\n\n## Example\n### 2026-07-19\n- Changed: moved Immich storage mount from local disk to NAS share\n- Why: local SSD was nearly full\n- Systems affected: Immich, NAS, Docker host, backup job\n- Rollback path: switch compose file back to previous mount and restore original bind path\n- Verified: uploads, thumbnails, and backups all completed successfully
Why this tiny habit helps so much
You do not need a perfect incident history.
You just need enough recent context to notice patterns like:
the breakage started right after a DNS change
the backup job failed after storage moved
the reverse proxy issue began after certificate settings changed
That is often the difference between targeted troubleshooting and random guessing.
The minimum weekly maintenance routine for your docs
A good template still fails if you never revisit it.
The fix is not to schedule an eight-hour documentation day. The fix is to attach a short habit to the normal care-and-feeding of your lab.
Here is the routine a reasonable choice would be recommend:
Once per week
update changes.md with anything meaningful you touched
review one service entry in services.md
confirm one runbook still matches reality
save any new diagrams or screenshots into assets/
Once per month
test at least one documented recovery step
verify that hostnames and IPs still match your actual setup
remove dead notes, dead screenshots, and outdated paths
check that your documentation itself is backed up
If you keep docs in BookStack, follow the BookStack backup and restore guidance so the documentation system does not become its own single point of failure.
Common mistakes that make templates useless
A template is only helpful if it stays practical.
These are the mistakes I see most often.
1. Writing for your ideal future self instead of your tired real self
If a page is too long to scan quickly, it becomes less useful during real maintenance.
Write for the version of you who is troubleshooting at a bad hour, not the version who had coffee and unlimited patience.
2. Storing secrets directly in plain-text docs
Do not turn your notes into a password dump.
Document where secrets live, not the raw passwords themselves. That makes the docs safer and easier to share.
3. Letting screenshots replace actual notes
Screenshots help, especially for dashboards and router settings, but they should support the written note, not replace it.
A screenshot is much less searchable than a short sentence that says what changed and why.
4. Building too many categories too early
Beginners often create a perfect folder tree before they have enough content to justify it.
Start with five files. Split later if needed.
5. Never testing the runbook
A runbook that only exists on paper is still better than nothing, but a runbook you have tested once is much more trustworthy.
Even a dry run helps you spot missing details.
When to outgrow this starter template
This template is enough for a lot of home labs, especially if one person operates most of the stack.
You may want to evolve beyond it when:
multiple people need access to the docs
you want page-level permissions
your service list grows large enough that tagging and search become more important
you need diagrams, inventories, and procedures to cross-link heavily
your network starts to benefit from a dedicated source of truth like NetBox
That does not mean the template was wrong.
It means the structure did its job and now needs a more advanced home.
That is why this format is a good default. It is portable. You can move the exact same sections into Obsidian, BookStack, Wiki.js, or a Git-based docs site later.
What to do next
If you want the fastest useful upgrade after this article, do these three things today:
1. Create the homelab-docs/ folder.
2. Copy the five starter files from this page.
3. Fill in one real service, one real network segment, and one real runbook before you stop.
Do not wait for a perfect migration weekend.
One accurate page is more useful than ten empty placeholders.
If you want to keep building the cluster in a sensible order, this is the path a reasonable choice would be follow next:
You start with the template. Then you make the names cleaner. Then you pick a tool if you still need one. Then you make the recovery side real.
Frequently Asked Questions
What should a homelab documentation template include?
A useful homelab documentation template should include a README, service inventory, network notes, recovery runbooks, and a change log.
Should many operators use Markdown or a wiki for homelab documentation?
For many beginners, Markdown is the best starting point because it is simple, portable, searchable, and still available when a self-hosted wiki is down.
What is a runbook in a homelab?
A runbook is a step-by-step procedure for a routine task or failure scenario, such as restarting a service safely or restoring it from backup.
Do I need a documentation tool before I make templates?
No. A simple folder of Markdown files is enough to start, and you can move the same template into BookStack, Wiki.js, Obsidian, or Git later.