Disclosure: This article is an evidence-led guide. Recommendations are matched to documented requirements and do not claim private testing or first-hand operation.
Useful homelab documentation is an operating control: it records what exists, why it exists, what depends on it, and how to recover when the original operator is unavailable. The goal is not a perfect wiki. The goal is to make the next change, incident, and restore decision less dependent on memory.
Start with the systems that can create the largest recovery delay: identity, networking, storage, backups, and the dependencies between them. A short inventory plus a tested runbook is more valuable than a large collection of unowned notes.
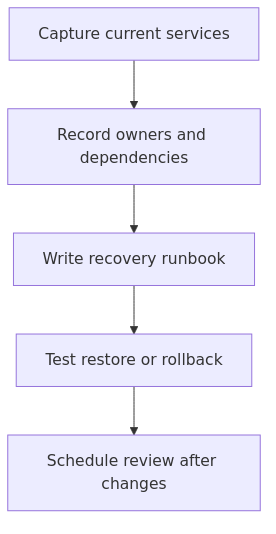
A practical sequence for turning homelab notes into recoverable operating documentation.
Key Takeaways
Document owners, dependencies, entry points, and recovery actions before polishing presentation.
Keep current-state inventory separate from procedures and decision records so each can be reviewed at the right cadence.
Attach restore and rollback checks to important runbooks; an untested procedure is only a hypothesis.
Why homelab documentation matters more than you think
A lot of beginner homelabs start small and messy at the same time.
You install Docker. Then one app becomes three. Then you add a reverse proxy. Then your router has DHCP reservations you forgot to label. Then a VPN, a DNS blocker, a NAS share, and a backup job quietly show up. Nothing feels too complicated in the moment because you built it one piece at a time.
That is exactly why documentation becomes important.
The problem is not that your setup is too advanced. The problem is that your setup changed gradually enough that your memory now has missing parts.
Good documentation helps with four practical jobs:
Troubleshooting - you can retrace how a service is wired together
Recovery - you know what to restore first and where the important data lives
Upgrades and migrations - you can move a service without rediscovering every dependency
Learning - writing things down forces you to understand your own setup more clearly
If you are still early in your journey, Treat documentation as part of the same operational routine as backups and safer remote access. It feels optional right before it becomes urgent.
If you need a broader foundations refresher, start with What Is a Homelab? and then come back here.
What to document first
This is where most people stall.
They know they should document their lab, but they try to document everything at once and end up documenting nothing. The fix is to prioritize the information that is hardest to reconstruct from a running system.
Planning the physical and operating side of your homelab? The Homelab Planning Bundle combines a rack planner with a build cost and power planner, so you can organize equipment, space, and running-cost decisions alongside your documentation. It is $19.99.
2. Service inventory
For each service, record:
what the service does
where it runs
how you reach it
what storage it uses
what it depends on
how it is backed up
This sounds basic, but it solves a common problem: you stop asking, "What breaks if the guide reboot this VM?"
3. Credentials location references
Do not dump passwords into plain-text docs.
Instead, document where credentials live and how to find them. For example:
admin account stored in Vaultwarden
SSH key location on laptop
recovery codes stored in password manager secure note
That is enough for a small or medium beginner homelab.
Here is what each file does.
README.md
This is your front door.
It should contain:
a quick description of the lab
main hosts and their IPs
a short list of critical services
where the rest of the docs live
where credentials are stored
last updated date
If you are checking docs from your phone during an outage, this page should help you orient yourself fast.
network.md
Use this file for:
subnet ranges
DHCP scopes
static reservations
VLAN IDs
switch and router management IPs
Wi-Fi SSIDs
DNS setup notes
If your network is still simple, one file is fine. If it grows later, split it out.
services.md
Keep one section per service or host. Think of it as your live inventory.
runbooks.md
This is where you put recovery steps and recurring procedures.
Examples:
how to restore Pi-hole
how to rebuild a Docker host
how to renew reverse proxy certificates if automation fails
how to rotate a secret or API key
changes.md
This file is simple and extremely valuable.
Every time you make a meaningful change, add a short note with the date.
Example:
2026-07-13\n- moved Jellyfin config to SSD-backed volume\n- changed DNS from router to Pi-hole\n- added Tailscale on mini-pc-01
It is not glamorous. It is also one of the easiest ways to avoid forgetting what changed right before a problem started.
Where should you keep homelab documentation?
There is no single correct answer. The best answer depends on how big your lab is and how much friction you will tolerate.
For most beginners, A practical choice is start with this rule:
choose the option you will actually maintain
make sure it still helps you when part of the homelab is down
Here is the practical breakdown.
Option
Best for
Strengths
Trade-offs
Markdown files in Git
Most beginners
Portable, searchable, versioned, outage-friendly
Less polished UI
BookStack
Structured self-hosted wiki
Easy page hierarchy, pleasant UI
Needs a running service and database
Wiki.js
Modern self-hosted docs
Great UX, markdown support, optional Git sync
Heavier than plain files
Obsidian
Solo, local-first docs
Fast note-taking, strong linking, works offline
Sharing and publishing take extra work
NetBox
Network-heavy labs
Excellent IPAM and device tracking
Overkill for small labs
The article's default recommendation: Markdown files in Git
For a lot of homelabbers, plain Markdown in a Git repo is still the strongest starting point.
Why?
it works offline
it is easy to back up
you can search it quickly
version history is automatic
it survives even when your internal wiki is offline
This also pairs nicely with configuration-as-code habits. If you already keep Compose files, scripts, or notes in Git, your documentation can live right next to them.
When BookStack makes sense
BookStack is great when you want a more structured wiki that feels friendlier than a file tree.
Its Books, Chapters, and Pages structure is easy to understand, especially if you want separate books for networking, services, and runbooks.
If you like a browser UI and want docs that feel organized without much tuning, BookStack is a solid option.
When Wiki.js makes sense
Wiki.js is a good fit if you want a modern interface and may eventually sync or publish documentation more broadly.
It is especially attractive when you like Markdown but want a more polished reading and editing experience than raw files.
When Obsidian makes sense
Obsidian is excellent if you prefer local files, backlinks between notes, and a personal second-brain style setup.
For solo homelab documentation, it is one of the easiest tools to keep using because it feels fast and lightweight.
When NetBox makes sense
NetBox is powerful, but A practical choice is only recommend it when your network is complex enough that spreadsheets and notes are starting to hurt.
If you have many devices, multiple VLANs, several subnets, and frequent IP changes, NetBox becomes much more attractive. If you have one mini PC, one NAS, and a switch, it is probably too much.
A simple template you can copy today
Here is a service template that works well for beginners.
## Service: Pi-hole\n\n- Purpose: Network-wide DNS filtering\n- Host: mini-pc-01\n- Access URL: http://192.168.1.20/admin\n- Container or VM: Docker container\n- Config location: /opt/pihole/docker-compose.yml\n- Data location: /opt/pihole/data/\n- Depends on: local DNS reachability, router DHCP settings\n- Backups: included in nightly Restic backup\n- Credentials: stored in Vaultwarden -> Infrastructure -> Pi-hole\n- Last major change: moved to new host on 2026-07-01\n- Notes: router DHCP hands out Pi-hole as primary DNS
And here is a network table you can keep in network.md.
IP / Range
Device or purpose
Notes
192.168.1.1
router / gateway
DHCP and internet edge
192.168.1.10
Proxmox host
management IP
192.168.1.20
Pi-hole
DNS filtering
192.168.1.30
NAS
SMB shares and backups
192.168.1.100-199
DHCP client pool
laptops, phones, tablets
You do not need perfect templates. You need consistent ones.
From the lab
The 30-minute homelab documentation sprint
If your lab already exists and feels undocumented, this is the catch-up plan A practical choice is use.
Step 1: create the docs folder
Start with either:
a Git repo called homelab-docs
a BookStack space or book
an Obsidian vault folder just for homelab notes
If you are unsure, pick Markdown in Git.
Step 2: write the network page first
Why this matters before anything else: networking confusion breaks everything else.
Document:
gateway IP
DNS server
DHCP range
static IPs
VLAN IDs if you use them
switch and AP management addresses
Step 3: write your top five services
Do not try to document every container in one session.
Start with the services you would miss most if the host died tonight. That usually means things like:
DNS blocker
password manager
reverse proxy
NAS or backup target
media server or dashboard
Step 4: write one recovery runbook
Pick one important service and write the restore steps while they are fresh.
That single runbook teaches you the habit better than reading ten productivity tips ever will.
Step 5: add a weekly update trigger
Attach documentation to another habit:
after a new service deployment
after a network change
every Sunday evening
before and after maintenance
Consistency matters more than elegance here.
What most competitors miss
A lot of homelab documentation articles do a good job naming tools. Fewer do a great job showing a small beginner-friendly system that is realistic to keep updated.
That is the angle A practical choice is keep in mind:
do not start with the fanciest app
start with the smallest system that improves recovery and clarity
only move into specialized tools when your lab actually needs them
A practical choice is not buy these before a useful first server. A practical choice is absolutely consider them once your lab starts to sprawl.
Common mistakes that make documentation useless
Documenting passwords in plain text
Use a password manager. Document the location of secrets, not the secrets themselves.
Writing giant walls of prose
Your docs should help you find answers fast. Use bullets, tables, templates, and short sections.
Duplicating config files into docs
If a Compose file or Git repo already describes the exact configuration, link to it. Do not create a second source of truth unless you enjoy future contradictions.
Never recording the reason behind a change
This is the most expensive mistake.
A firewall rule without a reason is future confusion waiting to happen.
Keeping docs only inside the homelab
This is a subtle trap.
If your wiki is inside the lab and the lab is offline, your documentation might vanish exactly when you need it most. That is why Git-backed files, exports, or offsite backups matter.
Over-engineering too early
You do not need NetBox, a wiki, a static site generator, and a diagramming workflow on day one.
Start with the minimum viable system. Grow later.
What to document this weekend in a small lab
For a small beginner lab with one Linux box, a router, Docker, and a few self-hosted apps, the article's first pass would look like this:
create homelab-docs
write README.md
list hostnames and IPs
document Docker services and storage locations
record where secrets are stored
add one restore checklist for the most important app
commit the docs to Git
back up the repo somewhere outside the lab
That is enough to make future changes less stressful.
Once you have documentation in place, the next skills that pay off fast are:
backup verification and restore testing
secret management
network segmentation and IP planning
reverse proxy and HTTPS hygiene
simple diagrams for hosts, VLANs, and service dependencies
For diagrams, diagrams.net is still one of the easiest places to start if you want something free and editable.
The point is not to produce beautiful docs for other people. The point is to make your own lab easier to understand, safer to change, and much less annoying to recover.
That is why good homelab documentation is one of the most practical upgrades you can make. It does not add blinking lights. It does not win benchmark charts. It just quietly saves your time when you need it most.
Frequently Asked Questions
What should the guide document first in a homelab?
Start with your network map, service inventory, and one recovery runbook. Those three documents solve the most painful troubleshooting and restore problems first.
What is the best tool for homelab documentation?
For many beginners, Markdown files in a Git repo are the best starting point because they are simple, portable, searchable, and still accessible when a self-hosted wiki is down.
Should the guide store passwords in a homelab documentation?
No. Store secrets in a password manager or vault, then document where those credentials live and how to access them.
Do the setup needs NetBox to document a small homelab?
Usually no. NetBox is excellent for larger network-heavy labs, but a smaller beginner setup can often be documented well with Markdown files, a wiki, or a spreadsheet-backed IP plan.
Sources and verification
This article is documentation-led. Verify current behavior against the linked primary sources before making production changes.