
Disclosure: This article may contain affiliate links. If you purchase through these links, we may earn a commission at no additional cost to you. We only recommend products and services that can be supported by cited vendor documentation, product specifications, or other primary sources. No hands-on testing is claimed here unless explicitly stated.
Self-Hosting
How to Manage IP Addresses in a Homelab: DHCP, DNS, Subnets, and VLAN Basics
Learn homelab networking basics: IP addresses, DHCP reservations, DNS, subnets, VLANs, and secure remote access without exposing services by accident.
HomelabAddiction Research Desk7 min read

Homelab networking gets confusing as soon as more than one service needs a predictable address, a readable hostname, or access from another device on the network.
This page helps beginners understand DHCP, DNS, subnets, NAT, and port forwarding by focusing on the small set of concepts that show up in almost every self-hosted setup.
It also covers the two follow-up questions that usually appear next: when to use DHCP reservations instead of a manually set static IP, and when a growing homelab should split devices into separate VLANs.
How this page is framed: protocol definitions here are anchored to RFC 2131 for DHCP and RFC 1034 for DNS. Safer remote-access references point readers toward Tailscale's overview documentation rather than ad hoc port exposure.
Table of Contents
- Homelab networking basics: the simplest safe default network
- 1) IP addresses (how devices find each other)
- 2) DHCP (who hands out IP addresses)
- 3) DNS (names like jellyfin.local instead of numbers)
- 4) Subnets (the boundary line)
- 5) NAT (why your whole house shares one public IP)
- 6) Firewalls (who is allowed to talk to whom)
- 7) Ports (what service are you trying to reach?)
- 8) Port forwarding (the most common way people expose things accidentally)
- 9) VPNs (remote access without opening random ports)
- FAQ
- Next steps
Homelab networking basics: the simplest safe default network
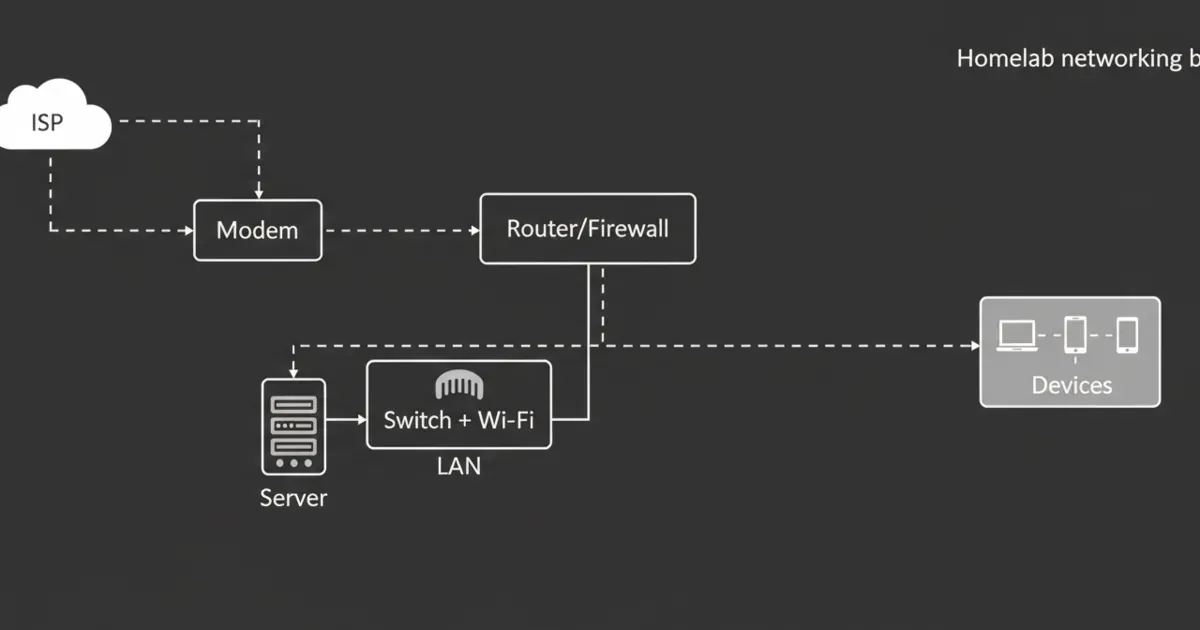
A safe default is boring on purpose:
- One router (your normal home router)
- One LAN subnet
- Services stay local-only
- No port forwarding until you know why you need it
Once that is stable, you can add complexity like VLANs.
1) IP addresses (how devices find each other)
An IP address is the number a device uses to talk on a network.
In a homelab, you will mostly see private IP ranges, not public internet addresses.
If you want the primary reference, see RFC 1918 (private IPv4 addressing): https://www.rfc-editor.org/rfc/rfc1918
Practical tip:
- Give your server a stable address (either a static IP or a DHCP reservation).
2) DHCP (who hands out IP addresses)
DHCP is the thing that automatically gives devices an IP address when they join your network.
If DHCP is flaky, your homelab will feel randomly broken.
Practical tip:
- Use DHCP reservations for servers and important devices so their IP does not change.
3) DNS (names like jellyfin.local instead of numbers)
DNS translates names to IP addresses.
This is why people set up Pi-hole or AdGuard Home early. Even if you do not block ads, having a DNS service you control helps keep names consistent.
References:
- Pi-hole documentation: https://docs.pi-hole.net/
Practical tip:
- Decide on a naming scheme for your services and stick to it.
4) Subnets (the boundary line)
A subnet is just a way to group IP addresses so networks can be separated.
Most home networks start with one subnet. That is fine.
A common beginner mistake is adding multiple subnets too early, then spending hours debugging why devices cannot discover each other.
5) NAT (why your whole house shares one public IP)
NAT is how most home routers let many devices share a single public internet connection.
NAT is normal. It is also why exposing a service to the internet usually involves port forwarding.
6) Firewalls (who is allowed to talk to whom)
A firewall is a set of rules that allows or blocks traffic.
In a homelab, the goal is not to block everything. The goal is to block the internet from reaching internal services unless you explicitly allow it.
If you want a strong open-source firewall platform reference:
- OPNsense documentation: https://docs.opnsense.org/
Practical tip:
- Default deny inbound from the internet.
- Be very picky about exceptions.
7) Ports (what service are you trying to reach?)
An IP address gets you to the machine. A port gets you to the specific service.
This is why you see addresses like:
Practical tip:
- Keep a simple list of what ports you use for what. It prevents collisions and confusion.
8) Port forwarding (the most common way people expose things accidentally)
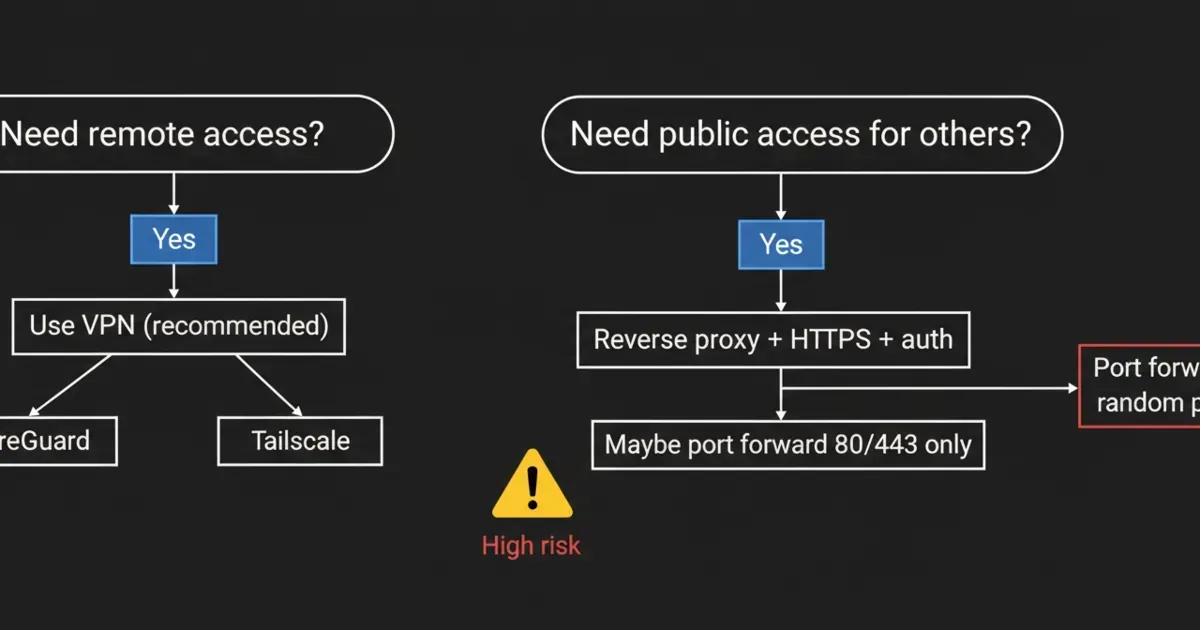
Port forwarding tells your router: “Anything that hits my public IP on this port, send it to this internal device.”
This is useful, but it is also the fastest way to expose a service you did not intend to expose.
A safer default for remote access is a VPN.
References:
- WireGuard project: https://www.wireguard.com/
From the lab
9) VPNs (remote access without opening random ports)
A VPN creates a secure tunnel so you can access your homelab like you are at home.
In practice, a VPN is often the simplest way to:
- access dashboards
- access media
- manage servers
If you want a popular, easy option to learn from:
- Tailscale documentation: https://tailscale.com/kb/
Practical tip:
- Start with VPN for remote access.
- Add public exposure only when you have a clear reason.
DHCP reservation vs static IP: which should you use?
For most homelabs, DHCP reservations are the safer default for servers, mini PCs, and appliances that need stable addresses. They keep addressing predictable while leaving the router in charge of the lease history. Manually set static IPs still make sense for infrastructure that must survive a DHCP outage or for gear that does not handle reservations cleanly.
How to create a simple subnet plan for a homelab
A small homelab usually works well with one main LAN first, documented reservations for key services, and a clear naming pattern. Add a second subnet or VLAN only when there is a reason, such as isolating IoT clients, guest devices, or lab experiments from the devices you trust most.
When should a homelab add VLANs?
Add VLANs when separation solves a real problem, not just because the switch supports them. The best early use case is keeping untrusted or noisy devices away from admin tools, NAS shares, and management interfaces while preserving simple routing rules you can still explain later.
How to secure remote access to a homelab
The safest default is still VPN-first remote access. Reach the services privately first, then decide whether any public exposure is truly necessary. If you do publish a web app later, treat that as a separate decision from basic admin access.
FAQ
What are the homelab networking basics I should learn first?
Start with IP addresses, DHCP, DNS, and ports. Those four explain most “why does this not work” problems.
Do I need VLANs for a homelab?
Not at the start. VLANs are useful for isolating risky devices, but they add complexity. Get one stable LAN first.
Why can I access a service by IP but not by name?
That is usually DNS. Check what DNS server your device is using and whether it has a record for the service.
What is the safest way to access my homelab from outside?
A VPN is the safest default. Port forwarding should be a deliberate choice with a security plan.
Next steps
Pick one improvement you can do today:
- Create a DHCP reservation for your server
- Set up local DNS for one service name
- Remove unnecessary port forwards
If your network becomes predictable, everything you self-host becomes easier.
After your subnet and DNS basics make sense, create a visual map before the lab changes again. This beginner guide on building a homelab network diagram pairs especially well with an IP plan template and a simple documentation folder.
Sources and verification
Last verified: 2026-07-23. This article was reviewed against the primary sources listed below. Unsupported first-person testing claims were removed unless they were backed by cited vendor material.
transmission signupstatus: open channel
article_topic // How to Manage IP Addresses in a Homelab
Start building a smarter homelab.
Join readers learning Proxmox, networking, storage, backups, and self-hosting without breaking everything.
Enter your email address to receive the Homelab Addiction newsletter.
Beginner-friendly
No gatekeeping. Just clear, actionable guides.
1 useful email / week
Practical tips, real-world setups, and lessons learned.
Zero hype, practical only
What works, what breaks, and how to fix it.
Reply to any email with what you're building.
I read and reply to as many as I can.
— The Homelab Addiction Operator
support // the lab
Found this guide useful?
If it saved you time or a rebuild, you can support more practical homelab guides.