How to Self-Host a Password Manager with Vaultwarden on Docker: A Safer Local-First Setup
Deploy Vaultwarden on Docker with a local-first exposure model, strong admin-token defaults, official Bitwarden clients, and backups you can test before you rely on it.
Vaultwarden is easiest to evaluate when the question is framed around access scope first, not just whether the container starts. A local-only or VPN-only deployment is often the safer first step because it lets you validate clients, backups, and admin settings before you widen exposure.
The operational work is straightforward once that scope is clear: keep the service behind a controlled access path, set a strong admin token, disable open signups unless there is a specific reason to allow them, and test the backup path before you trust the vault with recovery codes and daily credentials.
This page helps readers deploy Vaultwarden on Docker with official Bitwarden clients, a cleaner local-first security posture, and explicit notes about what must be verified before the service becomes part of daily life.
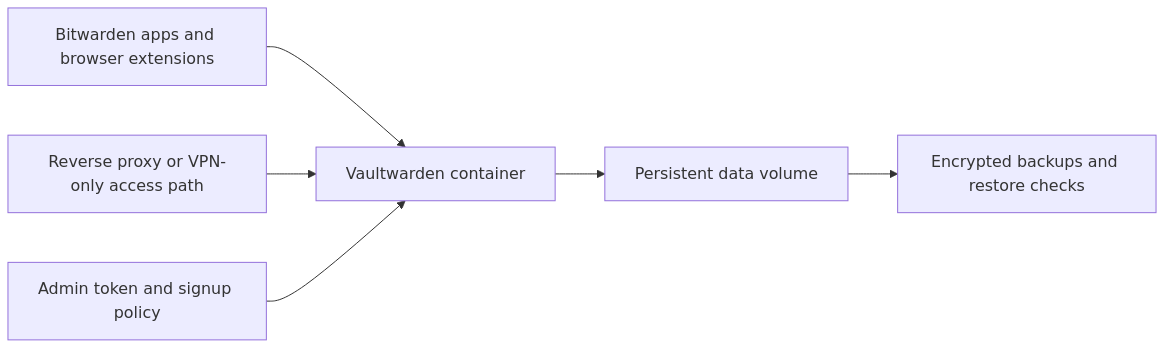
Vaultwarden layout: official clients talk to the Vaultwarden container, the service stays behind a controlled access path, and restore-tested backups matter as much as the initial Compose file.
Key Takeaways
Vaultwarden is a lighter self-hosted password-manager option for readers who want Docker-based deployment without the overhead of a heavier stack.
The safest first deployment is usually local-only or VPN-only access, not a public internet-facing login page on day one.
A working Vaultwarden setup is not just docker compose up -d. You also need HTTPS planning, a strong admin token, disabled open signups, and tested backups.
Vaultwarden works with official Bitwarden apps and browser extensions, so the client experience stays familiar even though you host the server yourself.
Readers who already run Docker can usually reach a clean starter deployment quickly, then harden it in stages.
If you have ever looked at self-hosted password managers and immediately felt the stakes go up, that reaction makes sense. Hosting Jellyfin wrong is annoying. Hosting a dashboard wrong is messy. Hosting the thing that stores your logins, notes, and possibly recovery codes feels different because it is different.
A lot of articles jump straight into a Compose file and imply the work is finished once the container starts. For a password manager, the more important questions are what you are protecting, how exposed the service should be, and which safety checks are non-negotiable before you trust it with daily credentials and recovery material.
Think of Vaultwarden like moving your house keys out of a key cabinet in somebody else's office and into a safe you keep at home. You gain privacy and control, but only if you also lock the safe, keep a backup key somewhere sensible, and stop leaving the garage door open.
This guide focuses on a safer first path for homelab readers:
Decide whether you should keep Vaultwarden local-only, VPN-only, or reverse-proxied
Deploy it with Docker Compose
Lock down signups and the admin interface
Connect official Bitwarden clients
Set up a backup and update routine you will actually keep doing
If you already have related pieces of your homelab in place, keep these guides handy because they pair well with this setup:
A self-hosted password manager is a trust exercise.
When you self-host Vaultwarden, you are not just choosing a cheaper or more private way to store passwords. You are accepting responsibility for uptime, updates, backups, and access control. That sounds intimidating, but it is manageable if you keep the scope realistic.
For a beginner homelab, the healthiest mindset is this:
start simple
keep the first deployment private
prove the backup works
expose it remotely only when you understand the security layers involved
transmission signup
article_topic // How to Self-Host a Password Manager with Vaultwarden on Docker
Don't leave without the setup notes.
Get practical homelab guides, failure logs, and beginner-friendly build notes in your inbox.
Enter your email address to receive the Homelab Addiction newsletter.
Weekly only. No spam. Unsubscribe anytime.
That is why I do not recommend that most new homelabbers start by publishing Vaultwarden directly to the internet with a quick port forward and a prayer. A password manager deserves more care than that.
If you want a plain-English rule:
Best starter option: local-only access on your LAN
Best remote option for most beginners: access it over WireGuard or another VPN
Public reverse proxy option: acceptable only when HTTPS, updates, backups, and access controls are already part of your routine
It is the same difference as keeping a safe inside your house versus putting the safe on your porch with a nice weather cover. One choice is naturally forgiving. The other only works if every other decision around it is excellent.
Vaultwarden vs official Bitwarden self-hosting, in plain English
Before setup, we need to clear up a common point of confusion.
Vaultwarden is not the official Bitwarden server. It is a lightweight, Bitwarden-compatible server written in Rust. The reason so many homelab users choose it is simple: it is smaller, lighter, and easier to run on modest hardware.
For many personal or family homelabs, that is a very good trade.
Here is the short version:
Option
Best for
Tradeoff
Bitwarden cloud
people who want convenience and vendor-managed uptime
less control over where the server lives
Official Bitwarden self-hosting
users who want the official stack and support path
heavier and more involved
Vaultwarden
homelab users who want a lightweight self-hosted option compatible with Bitwarden clients
unofficial project, so you own the support and maintenance path
Why this matters:
If your real goal is "I want my passwords somewhere private that I control, and I already know basic Docker," Vaultwarden usually makes more sense than turning your homelab into a bigger project than it needs to be.
If your real goal is "I want this to be somebody else's operational responsibility," then the cloud-hosted Bitwarden path may honestly be the better answer.
There is no prize for self-hosting the highest-stakes app in your stack if you are not prepared to maintain it.
What you need before you begin
Why this matters
Most failed Vaultwarden installs are not caused by Vaultwarden itself. They are caused by skipping one of the foundations:
Docker is not working correctly
the hostname plan is fuzzy
the admin token is weak
the operator exposes the container too early
backups are treated as a future problem
Step 1 - Verify your Docker host is ready
Run these commands on the host where Vaultwarden will live:
docker --version
docker compose version
uname -m
You want a working Docker install and a supported architecture such as x86_64 or aarch64.
If Docker still needs hardening, read How to Set Up Rootless Docker before you move sensitive services onto that box.
Step 2 - Decide how you will reach Vaultwarden
Pick one of these paths before you deploy:
Local-only - you use it only on your home network
VPN-only - you access it remotely through WireGuard or another VPN
Reverse proxy + HTTPS - you publish it behind a proper proxy with TLS
If you are not sure which one to choose, start with local-only. You can always add remote access later. It is much easier to safely widen access than it is to clean up after an overly open first deployment.
Step 3 - Generate a strong admin token
This matters because the admin portal is powerful. It is not where users normally log in, but it is absolutely something you want protected.
Generate a random token:
openssl rand -base64 48
Save that value somewhere safe. Do not paste it into a random note and forget about it. If you already use secret files or environment management, even better. My article on keeping secrets out of Docker Compose is a good next step once the basic deployment is running.
Recommended gear for a safer setup
You do not need expensive hardware for Vaultwarden, but a few items make this kind of service easier to run well:
A hardware security key like the YubiKey 5 NFC if you plan to tighten MFA on the accounts you use around your homelab
A backup target such as the Samsung T7 portable SSD so your encrypted vault is not living on exactly one disk forever
Those are not mandatory, but they are the kind of upgrades that turn a fragile hobby setup into something you trust a lot more.
Step 4 - Create the working directory
Why this matters
Give the service a clean home now and you will thank yourself later when you need to back it up, move it, or inspect it.
mkdir -p ~/compose/vaultwarden/data
cd ~/compose/vaultwarden
This gives you a simple layout where both the compose file and the persistent data directory stay together.
Step 5 - Create your environment file
Why this matters
Keeping the token in an environment file is not perfect security, but it is already better than hardcoding it into every example and emailing the compose file to yourself later.
SIGNUPS_ALLOWED: "false" stops random open registration, which is the safer default
WEBSOCKET_ENABLED: "true" helps official clients sync more cleanly
./data:/data keeps your persistent vault data outside the container
127.0.0.1:8080:80 binds the service to localhost on the Docker host, which is a very sensible beginner default because it avoids accidentally exposing the service on every interface
That last line is important.
A lot of guides map 8080:80 and call it a day. That exposes the service on the host's network interfaces. For a password manager, I would rather start private and deliberately widen access later.
Step 7 - Start Vaultwarden
Why this matters
Now we are finally at the point where starting the container is the right next move, not the first move.
docker compose up -d
Then verify it actually started:
docker compose ps
docker compose logs --tail=50
If everything looks healthy, test from the Docker host itself:
curl -I http://127.0.0.1:8080
You should see an HTTP response instead of a connection error.
That is your first real checkpoint. The goal is not "container exists." The goal is "service responds and I know where it is listening."
From the lab
Step 8 - Finish first-run setup in the browser
Why this matters
A password manager is only useful once you confirm that the web vault works and that the client flow matches your deployment plan.
If you are staying local-only for now, open the service from the same machine or through your internal network path.
Create your first account. Then immediately do three things:
Confirm signups are closed unless you intentionally want them open
Save a test login and verify it syncs
Install one official Bitwarden client or browser extension and point it at your self-hosted URL
This is where using official Bitwarden apps is helpful. The server is self-hosted, but the client experience stays familiar.
Step 9 - Decide whether to keep it private or publish it safely
Why this matters
This is the decision point that changes your risk profile the most.
If you only need Vaultwarden at home, stop here and keep it private. That is a perfectly good homelab outcome.
If you want remote access, I recommend this order of preference:
VPN first - cleanest beginner option
Reverse proxy with HTTPS - fine if you already understand the moving parts
Raw public exposure - do not do this
If you want the VPN path, my WireGuard on Docker guide is the route I would take before I exposed a password manager login page publicly.
If you want the reverse-proxy path, use either an existing proxy stack or follow How to Set Up Nginx Proxy Manager on Docker. Once HTTPS is working, update your .env file so DOMAIN uses the final https://vault.example.com address, then restart the stack:
docker compose down
docker compose up -d
If you already use centralized identity in your homelab, Authentik can help you protect the supporting apps around your environment, even if Vaultwarden itself remains a carefully handled special case.
Step 10 - Back it up before you trust it
Why this matters
A password manager without tested backups is like keeping your passport in a safe with no spare combination written down anywhere. It feels secure until the day it is not.
For a simple file-based backup of the persistent data directory:
mkdir -p ~/backups
tar czf ~/backups/vaultwarden-$(date +%F).tar.gz -C ~/compose/vaultwarden data
Then verify the file exists:
ls -lh ~/backups/vaultwarden-*.tar.gz
Even better:
copy that backup to another machine or external disk
schedule regular backups
test a restore before you ever need one under stress
If you already have a backup workflow, plug Vaultwarden into it now. Do not wait until after you have moved your family or team into the new vault.
Step 11 - Update it on purpose
Why this matters
Self-hosting security is not a one-time install. It is a habit.
A simple update routine looks like this:
cd ~/compose/vaultwarden
docker compose pull
docker compose up -d
docker image prune -f
After updating, verify the service still works:
docker compose ps
docker compose logs --tail=50
And do one user-facing check too:
log in through the web vault
confirm your browser extension still syncs
verify your mobile app can still reach the server if you use remote access
A container update that "completed successfully" but broke your client sync is not really a successful maintenance window.
Common mistakes
These are the errors I would watch for first if a friend asked me to sanity-check their setup.
1. Exposing Vaultwarden publicly before HTTPS is ready
HTTP is not good enough here. If remote access matters, use a proper reverse proxy with TLS or keep it behind a VPN.
2. Leaving signups open
If SIGNUPS_ALLOWED stays enabled by accident, you are giving yourself one more thing to forget about until it becomes a problem.
3. Using a weak or reused admin token
The admin interface should be treated like a sensitive control plane, not like a throwaway test password.
4. Forgetting that backups matter more than screenshots of the compose file
A screenshot helps you rebuild the container. It does not restore the encrypted vault data.
5. Treating a password manager like any other small app
A media app can tolerate sloppy exposure decisions better than a password manager can. This is one place where boring, cautious defaults are a strength.
6. Skipping a client test after deployment
You want to prove the browser extension, web vault, and mobile path all work before you start migrating your real credentials.
FAQ
Is Vaultwarden safe to self-host?
Yes, it can be safe to self-host if you understand that safety comes from the whole operating model, not just the software. Keep it private by default, use HTTPS for public access, disable open signups, update it regularly, and maintain tested backups.
Should beginners choose Vaultwarden or official Bitwarden self-hosting?
For most homelab beginners, Vaultwarden is the easier path because it is lightweight and works well with official Bitwarden clients. If you need the official vendor path and are comfortable with a heavier setup, official Bitwarden self-hosting may suit you better.
Do I need to expose Vaultwarden to the internet?
No. In fact, many people are better off keeping it local-only or accessing it through a VPN. Remote convenience is nice, but it should come after you are confident in your HTTPS, update, and backup routine.
What should I back up?
At minimum, back up the persistent Vaultwarden data directory and store a copy somewhere outside the host. If you rely on a reverse proxy or DNS configuration for access, document that too.
Can I use the normal Bitwarden browser extension and mobile app?
Yes. That is one of the nicest parts of Vaultwarden. You self-host the server, but you still get the familiar Bitwarden client experience.
What to learn next
Once Vaultwarden is running, these are the next upgrades I would make in order:
Add identity and access polish around the rest of your stack with Authentik
If you take only one lesson away from this article, let it be this: the best self-hosted password manager setup is not the most complicated one. It is the one you can explain, back up, update, and defend without guessing.
transmission signupstatus: open channel
article_topic // How to Self-Host a Password Manager with Vaultwarden on Docker
Start building a smarter homelab.
Join readers learning Proxmox, networking, storage, backups, and self-hosting without breaking everything.
Enter your email address to receive the Homelab Addiction newsletter.
Beginner-friendly
No gatekeeping. Just clear, actionable guides.
1 useful email / week
Practical tips, real-world setups, and lessons learned.
Zero hype, practical only
What works, what breaks, and how to fix it.
Reply to any email with what you're building. I read and reply to as many as I can.
— The Homelab Addiction Operator
support // the lab
Found this guide useful?
If it saved you time or a rebuild, you can support more practical homelab guides.