Disclosure: This article may contain affiliate links. If you purchase through a link, we may earn a commission at no additional cost to you. Recommendations are matched to the documented requirements described below.
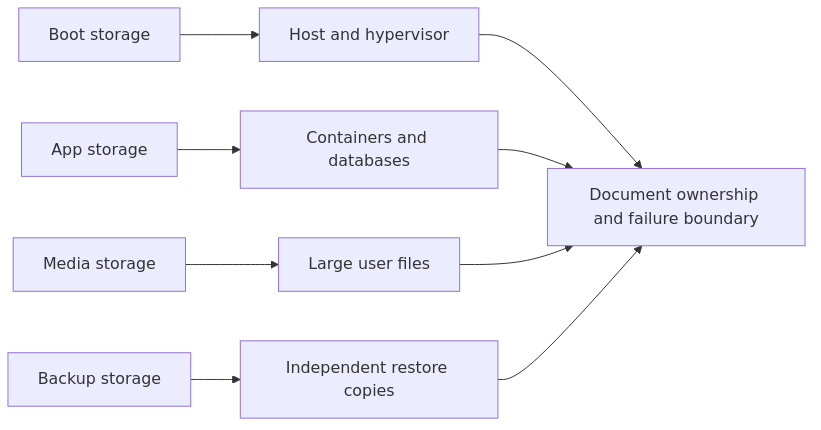
Evidence-led decision flow for separating boot, applications, media, and backups.
Homelab storage design is a placement and recovery problem. Boot files, active applications, bulk media, and backups have different capacity, latency, failure-domain, and restore requirements.
The useful question is not which storage product is best in isolation. It is which workload belongs on which tier, what happens when that tier fails, and how a restore is verified.
Key Takeaways
Separate boot, application, media, and backup roles before migrating workloads.
Match latency and capacity needs to the workload instead of treating every disk as interchangeable.
Keep backup copies outside the primary failure domain and verify restores periodically.
What a homelab storage solution actually means
Search intent around “homelab storage solution” is best answered with a concrete layout model rather than a list of storage acronyms.
The short version is:
A real homelab storage solution is not one product. It is a layout decision.
You are deciding:
1. where the hypervisor boots
2. where VMs and containers live
3. where large datasets live
4. where backups live
5. how much redundancy each tier deserves
6. what can die without ruining your weekend
That is why the guide uses a design article over another generic storage-types explainer. Most people do not need ten paragraphs on what NFS stands for. They need a clear answer to "where should each kind of data go so this setup stays fixable?"
The main boundary rule
Do not mix critical boot, latency-sensitive app storage, bulk media, and backups into one emotional junk drawer.
You can build one giant ZFS pool and throw everything into it. That layout can work until you need to troubleshoot performance, expand capacity, isolate failure domains, or explain your setup six months later.
A common failure pattern is:
A legacy layout may keep VM disks, Plex media, ISO files, snapshots, and random exports all on the same storage pool because it felt tidy. It was tidy in the same way one giant junk drawer is tidy. Everything was technically in one place, which meant nothing had a clear role.
A clearer design splits storage by behavior.
Boot storage should be boring and dependable.
Active app storage should be fast.
Bulk data storage should be cheap and expandable.
Backup storage should be isolated from the mess above.
Once you accept those boundaries, the rest gets easier.
A four-tier homelab storage layout
Tier
What belongs there
Best media
Why
Boot tier
Proxmox OS, host config, minimal local system data
Mirrored SSD or NVMe
Fast boot, easy recovery, predictable host behavior
Active tier
VM disks, LXC rootfs, databases, app configs
SSD or NVMe, often mirrored
Latency-sensitive workloads feel the difference immediately
Bulk tier
Media libraries, downloads, ISO archives, cold project files
Large HDD mirror or RAID/ZFS array
Cheap capacity matters more than raw IOPS
Backup tier
Proxmox backups, PBS datastore, off-host copies
Separate HDD array, NAS, or remote PBS
Backups should survive mistakes in the primary tiers
That is the whole design in one table.
transmission signup
article_topic // Homelab Storage Design
Don't leave without the setup notes.
Get practical homelab guides, failure logs, and beginner-friendly build notes in your inbox.
Enter your email address to receive the Homelab Addiction newsletter.
Weekly only. No spam. Unsubscribe anytime.
Everything else is implementation detail.
Tier 1: Boot storage should stay boring
For a Proxmox host, a mirrored SSD boot tier is a sensible option when the budget allows it.
Why? Because the host layer is too important to sit on one tired consumer drive if the machine is doing real work.
For smaller labs:
2 x SATA SSD mirror is perfectly respectable
2 x NVMe mirror is even better if the board supports it cleanly
keep the boot tier small and focused
Do not treat boot storage as the place for every VM by default. Proxmox itself is happiest when the host stays simple.
Useful commands:
lsblk -o NAME,SIZE,TYPE,FSTYPE,MOUNTPOINT\ncat /etc/pve/storage.cfg\npvesm status
If you install Proxmox on ZFS, the official storage docs and ZFS backend docs are worth reviewing before you start moving guests around:
Tier 3: Bulk storage should optimize for capacity and boundaries, not ego
Your media library does not need to live on the same premium flash that serves your databases.
That sounds obvious, but a lot of homelabs end up doing exactly that because the first big SSD feels convenient. Then Jellyfin scans, downloads, backups, and large file moves start competing with actual app storage.
Bulk storage is where a homelab can place:
media libraries
ISO and template archives
long-term document dumps
camera exports
large download staging areas
non-latency-sensitive shared files
This tier is where large HDD mirrors or NAS-backed shares make sense.
single-node Proxmox box - local mirrored HDD bulk tier is fine
two or three-node lab - shared NAS starts making more sense for media, backups, and reusable datasets
high-availability fantasies on a budget - slow down and keep it simple before adding shared storage just because the diagram looks cool
Shared storage is useful when it solves a real workflow problem. It should not be your first instinct.
Tier 4: Backup storage is not just "more storage"
Snapshots are great. Snapshots are also not backups.
If your VM disks, media, and snapshots all live in the same failure domain, you do not have a backup strategy. You have a confidence problem.
Your backup tier should be one of these:
a dedicated local backup disk or pool
a separate NAS
a Proxmox Backup Server datastore
an off-host PBS target
a combination of local plus offsite copies
The Proxmox community advice on this is consistent: separate backup storage matters, and Proxmox Backup Server earns its keep fast once you have multiple VMs to protect. The official PBS docs are the right baseline if you are designing this properly: Proxmox Backup documentation.
That order prioritizes recoverability and workload fit over buying the biggest drive first.
Once your backup tier is separate from your app and media tiers, the next logical step is a dedicated Proxmox Backup Server setup for homelabs. That is where the guide lays out the retention, verification, and offsite sync workflow that turns this storage design into something you can actually recover from.
A homelab storage solution is the layout you use to separate boot storage, active VM or app storage, bulk data, and backups so each workload lands on the right tier.
Should Proxmox VMs live on SSD or HDD storage?
Most active Proxmox VMs should live on SSD or NVMe storage. HDD tiers make more sense for bulk media, archives, and backup repositories.
Are ZFS snapshots enough for homelab backups?
No. Snapshots help with quick rollback, but they are not enough unless you also keep separate backup copies outside the primary storage failure domain.
When should a homelab use shared storage?
Use shared storage when it solves a real problem such as multi-node access to bulk data or backup centralization. Do not add it just to make a small lab look more enterprise-like.
Sources and verification
Primary documentation checked before this revision:
Verification scope: source URLs were checked for reachability; article claims are framed as documentation-based guidance rather than private testing results.
transmission signupstatus: open channel
article_topic // Homelab Storage Design
Start building a smarter homelab.
Join readers learning Proxmox, networking, storage, backups, and self-hosting without breaking everything.
Enter your email address to receive the Homelab Addiction newsletter.
Beginner-friendly
No gatekeeping. Just clear, actionable guides.
1 useful email / week
Practical tips, real-world setups, and lessons learned.
Zero hype, practical only
What works, what breaks, and how to fix it.
Reply to any email with what you're building. I read and reply to as many as I can.
— The Homelab Addiction Operator
support // the lab
Found this guide useful?
If it saved you time or a rebuild, you can support more practical homelab guides.