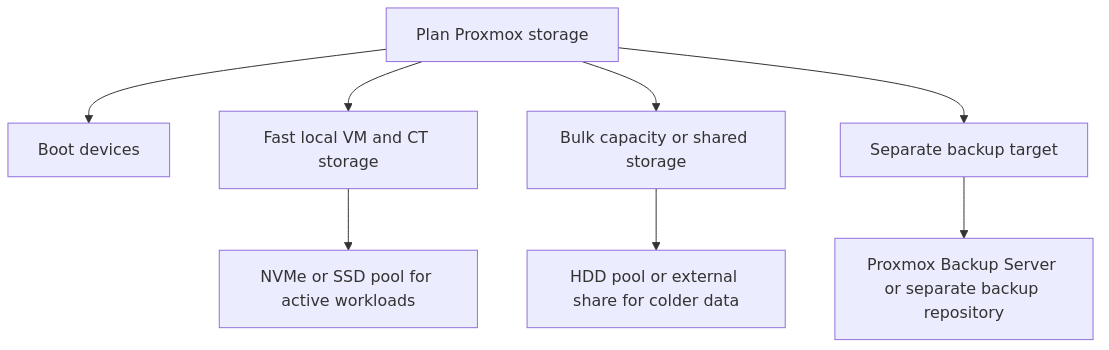
A durable Proxmox storage plan starts by separating jobs: fast local storage for active guests, cheaper capacity for colder data, and a distinct backup target that does not share failure domains with the primary pool.
That separation keeps snapshots, restores, and performance tuning simpler. It also prevents the common failure mode where VM disks, templates, media, and backups all compete on the same pool until recovery becomes slow and messy.
This page helps homelab operators design those boundaries around Proxmox storage roles and recovery paths using documented storage behavior rather than personal lore about which layout feels right.
Storage tier map: keep fast local storage for active guests, move colder data to cheaper capacity tiers, and keep backups on a separate target instead of sharing the primary pool.
The storage tiers I recommend
Think in four tiers.
Tier 1 - Boot and host OS
This is your Proxmox installation disk. Keep it boring.
Use:
a dedicated SSD or NVMe drive
enough space for logs, updates, and host overhead
no large VM disks if you can avoid it
If your host OS and your busy VM disks live on the same tiny consumer SSD, eventually one of them gets grumpy. Usually both.
Tier 2 - Primary workload storage
This is where your active VM and LXC disks should live.
Use:
NVMe if possible
SATA SSD if budget matters more than peak IOPS
ZFS or LVM-thin depending on your design goals
This tier should hold:
VM operating system disks
LXC root filesystems
small to medium databases
fast application data that benefits from low latency
This is the part of the lab you actually feel every day. If this tier is slow, everything feels slow.
Tier 3 - Bulk capacity storage
This is where large, less latency-sensitive data belongs.
Use:
HDD RAID or ZFS pool
SSD cache only if you know why you need it
NAS-backed datasets if that fits your layout
This tier should hold:
media libraries
archives
large file shares
cold application data
template repositories if your main pool is tight
Do not assume every byte in your lab deserves NVMe. Your Linux ISOs are not emotionally damaged by sitting on spinning rust.
Tier 4 - Backup storage
This is separate from everything above.
Use:
Proxmox Backup Server on another machine, NAS, or storage target
storage that is physically or logically separate from the primary node
enough retention to survive both mistakes and bad updates
This tier should hold:
VM backups
container backups
configuration backups
snapshots exported off the node
If your backups live only on the same storage stack as your production VMs, you do not have a backup strategy. You have a hope-based lifestyle.
What I recommend for most single-node homelabs
For a single Proxmox node, this is the safest default layout:
Disk 1: Proxmox host OS
Disk 2: fast SSD or NVMe for VM and LXC disks
Disk 3 or NAS: bulk storage and backup destination
If the node is modest, a very sane setup is:
transmission signup
article_topic // Proxmox Storage Architecture
Don't leave without the setup notes.
Get practical homelab guides, failure logs, and beginner-friendly build notes in your inbox.
Enter your email address to receive the Homelab Addiction newsletter.
Weekly only. No spam. Unsubscribe anytime.
500 GB boot SSD or small NVMe
1 TB or 2 TB NVMe for active workloads
HDD pool or NAS share for backups and large data
That gives you a clean separation between "stuff that must be responsive" and "stuff that must be large." It also makes future migrations much easier.
If you only have one good NVMe, this is where the ZFS versus LVM-thin question matters.
ZFS vs LVM-thin - what I actually choose
Both ZFS and LVM-thin can fit a homelab. The better choice depends on redundancy goals, disk count, memory overhead, and snapshot expectations rather than ideology.
Choose ZFS when:
you want strong snapshot behavior
you care about checksumming and data integrity
you plan to use replication between nodes
you have enough RAM to support it comfortably
you prefer fewer moving parts between filesystem and volume management
ZFS is the better architecture tool when the storage tier is important enough to deserve real design. For multi-disk pools, especially mirrored SSDs or mirrored NVMe, it is excellent.
It also pairs well with the rest of the Proxmox ecosystem. If you are already leaning into snapshots, replication, and recovery discipline, ZFS feels like the adult choice.
Choose LVM-thin when:
you have a single fast disk
you want something simpler
you need snapshots but do not need ZFS features
you care more about straightforward setup than filesystem elegance
On a single NVMe, ZFS is not automatically wrong, but it also is not automatically worth the added overhead. The decision should follow the recovery and redundancy goals of the host.
A lot of homelabbers install ZFS on one disk because it feels like the serious option. That is a fine way to spend a weekend. It is not always a fine way to reduce complexity.
My practical rule
Single fast disk: LVM-thin is perfectly reasonable.
Mirrored SSDs or mirrored NVMes: ZFS usually wins.
Cluster replication strategy: ZFS becomes much more attractive.
For more on ZFS specifically, bookmark the official Proxmox ZFS guidance and the site companion guide to Proxmox ZFS setup.
Local vs shared storage - when shared storage is worth the hassle
This is where people overbuild.
Shared storage is useful when you need:
live migration between nodes
centralized datastore management
multiple nodes reading the same storage pool
a cluster workflow that justifies the extra complexity
Shared storage is not useful merely because it makes your rack sound more enterprise-y when you talk about it.
Local storage is usually better when:
you run a single node
you have a small 2-node lab
most of your services can tolerate a short reboot during migration
you want better performance per dollar
you prefer simpler failure domains
Shared storage is worth considering when:
you have 3+ nodes and actually move workloads around
you already run a reliable NAS or SAN layer
your network is fast enough to support it cleanly
you understand what the storage backend becomes responsible for
For many homelabs, NFS-backed shared storage is fine for ISO images, templates, and sometimes less critical VM storage. Ceph can be excellent, but it should be chosen for a real cluster need rather than because it appears early in the documentation.
Ceph starts making sense when you truly want distributed shared storage and you have the nodes, disks, and network to support it. On underpowered labs, it often becomes a science project that teaches you humility. Which is valuable, to be fair, but not always the goal.
The sample layouts I recommend
Layout 1 - Single-node lab that wants to stay sane
Best for:
most home labs
5 to 20 services
light VM work and a few important containers
Recommended split:
Boot SSD: Proxmox host
NVMe: VM and LXC disks
NAS or HDD pool: backups, ISO images, media, archives
This is the highest value design for most people.
Layout 2 - Two-node cluster without fake enterprise nonsense
Best for:
people who want node redundancy
people willing to accept replication instead of always-on shared storage
Recommended split:
local ZFS pool on each node for active workloads
scheduled replication between nodes for important guests
separate PBS or NAS target for backups
This layout is pragmatic. It does not pretend a 2-node homelab is a data center. It gives you resilience without dragging in more complexity than the cluster can justify.
If clustering is the next step, read the companion Proxmox cluster setup guide before finalizing the storage plan.
Layout 3 - Three-node cluster that actually benefits from shared services
Best for:
advanced homelabs
mixed HA experiments
people who know exactly why they want shared storage
Recommended split:
local fast storage for active guest disks where practical
shared storage only for workloads that truly need mobility
PBS for backup retention and restore testing
separate network planning so storage traffic is not fighting with everything else
This is where storage networking matters. If your cluster networking is sloppy, your storage design will punish you later.
Storage design is also a networking decision. If the host uses separate storage, migration, or backup networks, review the companion Proxmox networking guide at the same time.
Where each kind of data should live
This is the part most people skip, then regret.
VM OS disks
Put them on fast local storage.
A VM boot disk is where a lot of small, annoying I/O lives. The difference between HDD-backed and SSD-backed VMs is not subtle. It is the difference between "this feels fine" and "why is opening apt slower than my childhood computer?"
LXC root filesystems
Also put these on fast local storage.
LXCs are light, but they still benefit from SSD or NVMe storage. If the workload choice itself is still open, review the companion Proxmox LXC vs VM guide.
Large media and file shares
Put them on HDD pools, NAS storage, or bulk datasets.
Do not spend premium NVMe capacity on media files unless you have a very specific reason.
ISO images, templates, and snippets
These can live on slower storage without much pain.
Just keep them available and organized. They do not need your nicest disk.
Backups
Put them off the primary host.
That can be PBS, a NAS, or another box entirely. What matters is that a failure of the main storage tier does not take the backups down with it.
I covered this in more detail in Proxmox backup strategies, because backup design is where optimism goes to die.
From the lab
Commands I use to audit a Proxmox storage layout
Before changing anything, I want a quick picture of what the node is doing today.
Check Proxmox storage backends
pvesm status\npvesm list local-lvm\ncat /etc/pve/storage.cfg
pvesm status gives you the useful overview. storage.cfg tells you what story the UI has been trying to summarize politely.
Check ZFS health and usage
zpool status\nzpool list\nzfs list
If you are using ZFS and you are not checking pool health, you are outsourcing your confidence to denial.
The point is not to copy this blindly. The point is to separate active guest storage from templates and backups, then keep backup retention outside the node.
Mistake 1 - treating one large pool like a good architecture
A big pool is not a design.
It is just a big pool.
When everything shares the same performance tier, retention logic, and failure domain, life is simpler at first and uglier later.
Mistake 2 - storing backups beside the thing being backed up
This is the classic homelab move.
You schedule backups, feel responsible, then discover the backups were living on the same storage stack the whole time. That is not recovery. That is local theater.
Mistake 3 - overvaluing shared storage
I like shared storage when it solves a real problem.
I do not like it when people bolt it into a small homelab because they think every cluster needs to cosplay as VMware circa 2017.
Mistake 4 - ignoring growth paths
Your first layout should not assume infinite disks, but it should assume future change.
If you know you will add a NAS later, or a second node later, build a storage model that makes migration straightforward. Clean boundaries now save ugly weekends later.
Recommended gear for this kind of layout
If you are building or upgrading around the architecture above, these are the kinds of products I would prioritize:
Battery backup so a power blip does not corrupt your day:APC Back-UPS 1500VA
I would spend money on storage quality and backup power before I spent it on something flashy. A faster CPU is fun. Recoverable infrastructure is better.
Frequently Asked Questions
Should I use ZFS or LVM-thin for Proxmox?
If you have a single fast disk and want straightforward management, LVM-thin is still a good answer. If you want better integrity features, snapshots, and replication-friendly architecture, ZFS is usually the stronger long-term design.
Should backups live on the same Proxmox storage as my VMs?
No. Keep backups on a separate system or storage target. If the primary storage pool fails, you do not want your backups disappearing with it.
Do I need shared storage for a Proxmox homelab cluster?
Not always. Plenty of 2-node and even some 3-node labs work better with local fast storage plus replication and proper backup design. Shared storage is helpful when you truly need live migration or centralized storage mobility.
What should live on NVMe in Proxmox?
Put active VM disks, LXC root filesystems, and latency-sensitive services on NVMe. Do not waste premium flash on cold archives or backup retention unless you have a very unusual requirement.
Final recommendation
If you want the short version, here it is.
Use a dedicated host disk. Put active guest workloads on your fastest local storage. Put large data on capacity storage. Send backups somewhere else. Prefer simple designs until your lab gives you a real reason to add complexity.
That architecture will age better than the all-in-one pool most people start with. It will also make restores, migrations, and upgrades much less dramatic.
And in homelabs, boring recoverability beats clever fragility every single time.
transmission signupstatus: open channel
article_topic // Proxmox Storage Architecture
Start building a smarter homelab.
Join readers learning Proxmox, networking, storage, backups, and self-hosting without breaking everything.
Enter your email address to receive the Homelab Addiction newsletter.
Beginner-friendly
No gatekeeping. Just clear, actionable guides.
1 useful email / week
Practical tips, real-world setups, and lessons learned.
Zero hype, practical only
What works, what breaks, and how to fix it.
Reply to any email with what you're building. I read and reply to as many as I can.
— The Homelab Addiction Operator
support // the lab
Found this guide useful?
If it saved you time or a rebuild, you can support more practical homelab guides.