
Disclosure: This article may contain affiliate links. If you purchase through these links, we may earn a commission at no additional cost to you. We only recommend products and services that can be supported by cited vendor documentation, product specifications, or other primary sources. No hands-on testing is claimed here unless explicitly stated.
Self-Hosting
How to Secure Remote Access to a Homelab: Safer Defaults for Beginners
Secure homelab remote access with VPN-first defaults, limited exposure, patching, and a practical checklist for home servers.
HomelabAddiction Research Desk8 min read

Remote access changes the risk profile of a homelab because the moment a service is reachable from outside the house, it stops being a purely local experiment.
This page helps beginners protect that transition by prioritizing VPN-first access, deliberate exposure, and a repeatable checklist grounded in current vendor documentation.
How this page is framed: the safer-default guidance in this article is checked against Tailscale's overview, Cloudflare Tunnel documentation, and the Nginx Proxy Manager guide. No private penetration-testing or personal breach-story claims are used as evidence.
Table of Contents
- Homelab security rule #1: start local-only
- Rule #2: assume scans are constant (because they are)
- Rule #3: avoid random port forwarding
- Rule #4: use VPN-first remote access
- Rule #5: if you expose anything publicly, put it behind HTTPS and authentication
- Rule #6: keep the host boring and patched
- Rule #7: reduce blast radius with segmentation (only when you are ready)
- Rule #8: use one hardened front door (reverse proxy) instead of many open ports
- Rule #9: treat credentials like the real security boundary
- Rule #10: block brute force and alert on weird login behavior
- Rule #11: backups are a security feature
- Rule #12: audit your exposure regularly
- Rule #13: monitor the boring signals
- A simple homelab security checklist (use this per app)
- FAQ
- Is port forwarding always unsafe for homelab security?
- What is the safest way to access my homelab remotely?
- Should I expose Jellyfin, Home Assistant, or my NAS UI to the internet?
- Do I need VLANs and a DMZ for homelab security?
- How do I know if I accidentally exposed something?
- What is the one thing beginners forget?
- Next steps
Homelab security rule #1: start local-only
If you are new, keep your first services accessible only on your LAN.
Local-only removes 80% of the risk because the public internet cannot reach your app in the first place.
transmission signup
article_topic // How to Secure Remote Access to a Homelab
Don't leave without the setup notes.
Get practical homelab guides, failure logs, and beginner-friendly build notes in your inbox.
Enter your email address to receive the Homelab Addiction newsletter.
Weekly only. No spam. Unsubscribe anytime.
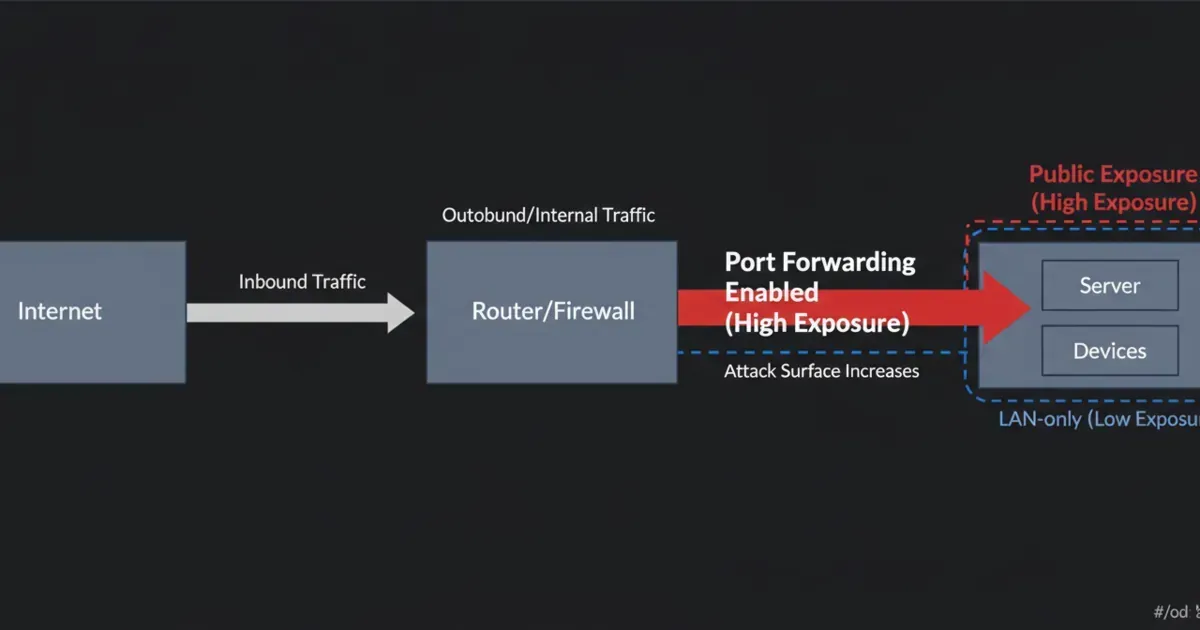
A practical way to enforce this is to avoid router port forwarding until you have a clear reason and a plan.
Rule #2: assume scans are constant (because they are)
The internet is not a quiet place. If you expose a port, it will be scanned.
You do not need a personal enemy. You just need to be discoverable.
So a good mental shift is:
- “If I expose this, it will be hit by automated login attempts.”
That one assumption makes your next decisions much saner.
Rule #3: avoid random port forwarding
Port forwarding tells your router to send traffic from the public internet to an internal device.
Beginners often do this for a dashboard, a NAS UI, or a media server. It works, but it also creates a public target.
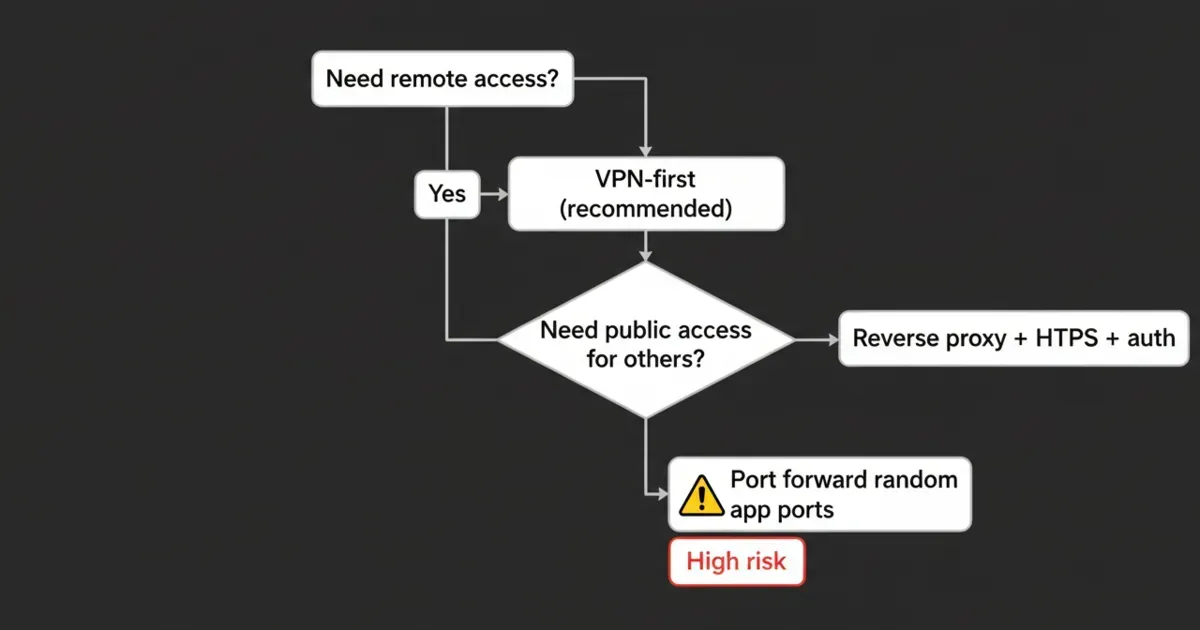
If you *must* port forward, prefer a single hardened entry point (like a reverse proxy on 80/443 with HTTPS and auth) rather than exposing a bunch of app ports.
Rule #4: use VPN-first remote access
For most people, the safest default is:
- VPN for you
- no public exposure for apps
A VPN makes your remote device feel like it is on your home network, without publishing your apps to the world.
References:
- WireGuard: https://www.wireguard.com/
- Tailscale (WireGuard-based): https://tailscale.com/kb/
Rule #5: if you expose anything publicly, put it behind HTTPS and authentication
If you decide a service must be reachable by others (or you want a public endpoint), treat it like a real production service.
Minimum baseline:
- HTTPS
- strong authentication (and ideally multi-factor)
- rate limiting where possible
References:
- Let’s Encrypt: https://letsencrypt.org/
- OWASP Authentication Cheat Sheet: https://cheatsheetseries.owasp.org/cheatsheets/Authentication_Cheat_Sheet.html
If you are tempted to expose an admin UI, stop and ask if a VPN would solve the same need.
Rule #6: keep the host boring and patched
Most homelab security failures are not “someone hacked Docker.” They are old services, default passwords, and unpatched software.
A boring routine is powerful:
- patch the OS
- update containers intentionally
- remove services you no longer use
If you are running Linux, basic SSH hardening is worth it:
- keys only (no password SSH)
- disable root login over SSH
- allow SSH only from your LAN or VPN subnet if possible
Rule #7: reduce blast radius with segmentation (only when you are ready)
You do not need VLANs on day one, but the idea matters.
Segmentation means risky or noisy devices do not sit on the same network as your servers.
A beginner-friendly progression:
- Start with one stable LAN.
- When you have time, create a separate network for IoT devices.
- Keep the homelab server network more restricted.
This is homelab security in practice: even if one device gets compromised, it is harder to pivot to everything else.
Rule #8: use one hardened front door (reverse proxy) instead of many open ports
If you decide something must be reachable over the internet, do not expose ten different app ports.
Use one entry point:
- reverse proxy
- HTTPS
- authentication
- optional IP allowlists
This keeps your exposure auditable. You can point to one place and say, “This is what is public.”
Rule #9: treat credentials like the real security boundary
A lot of homelab security comes down to identity.
Practical defaults:
- unique passwords
- a password manager
- turn on MFA where you can
- do not reuse your router password anywhere
If you run a reverse proxy with basic auth, make sure it is not your only defense for something truly sensitive.
Rule #10: block brute force and alert on weird login behavior
If something is public, you should assume it will be hammered.
At minimum, you want:
- rate limiting at the reverse proxy
- account lockouts where supported
- log visibility
Even simple protections reduce the chance that a weak password becomes your entire homelab security story.
From the lab
Rule #11: backups are a security feature
Security is not only about preventing break-ins. It is also about surviving failure.
You want to be able to recover from:
- a bad update
- a disk failure
- ransomware on a client device
A simple rule:
- if you cannot restore it, you do not really own it
Rule #12: audit your exposure regularly
A surprisingly effective homelab security habit is an exposure audit.
Once a month, ask:
- What ports are forwarded on my router?
- What DNS names point to my home IP?
- What services are intended to be public?
If you cannot explain why a port is open, close it and re-open only when you have time to verify.
Rule #13: monitor the boring signals
Beginners usually notice problems only when something is down.
You want to notice earlier:
- unexpected login attempts
- sudden spikes in traffic
- a new port open on your router
Lightweight monitoring is enough at first. Even uptime checks plus basic logs are a big upgrade.
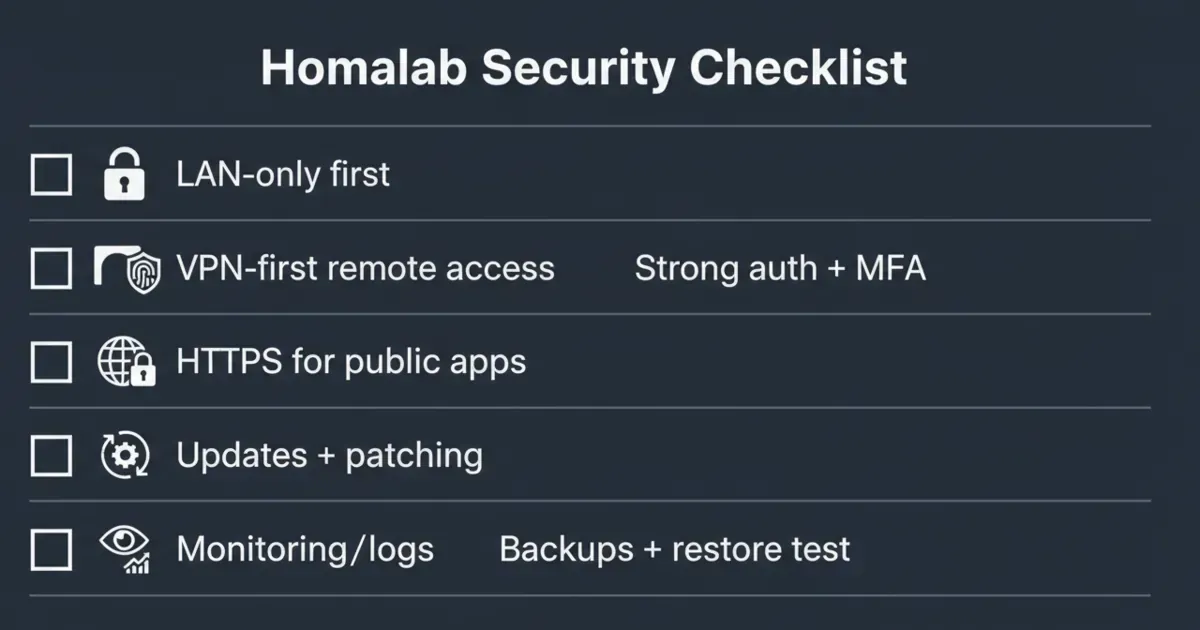
A simple homelab security checklist (use this per app)
Before you expose or rely on a service, verify:
- Is it LAN-only by default?
- Where do the data and config live?
- Do you have a restore path?
- Is authentication strong?
- Are updates manageable?
- Is it behind a single entry point (VPN or reverse proxy) instead of many open ports?
- Does it run with the least privileges possible (no extra admin access, no unnecessary mounts)?
Least privilege sounds advanced, but the homelab version is simple: do not give a container or app access to parts of the system it does not need. Every permission you remove is one less way a mistake turns into a full takeover.
FAQ
Is port forwarding always unsafe for homelab security?
Not always, but it is high-risk for beginners. If you do it, reduce the number of exposed services and harden the one entry point you publish.
What is the safest way to access my homelab remotely?
VPN-first is the safest default for most people. It avoids exposing app ports and keeps access limited to your devices.
Should I expose Jellyfin, Home Assistant, or my NAS UI to the internet?
Generally no, not directly. If you need remote access, use a VPN. If you need public access for others, use a reverse proxy with strong auth and HTTPS.
Expose one reverse proxy over HTTPS and put the service behind authentication, instead of forwarding the app port directly. If the service is only for you, VPN is still simpler and safer.
Do I need VLANs and a DMZ for homelab security?
Not at first. They are helpful once you understand your normal LAN well, but good defaults, VPN-first access, and fewer exposed services deliver most of the safety.
How do I know if I accidentally exposed something?
Start with your router’s port forwards. Then check what services are listening, and what you intended to publish. If you are unsure, remove forwards and re-add only what you can explain.
What is the one thing beginners forget?
Backups and restore tests. If you cannot restore, a bad update or compromise can become permanent data loss.
Next steps
Pick one improvement today:
- Remove any port forwards you do not 100% understand
- Set up VPN for remote access
- Turn on MFA on your most important accounts
- Write down backup and restore steps for one service
Homelab security is not about being perfect. It is about making exposure deliberate and recovery easy.
Related guide: If you are removing old internet-facing ports from your setup, read How to Replace Port Forwarding with Tailscale or Cloudflare Tunnel for a step-by-step migration path.
Sources and verification
Last verified: 2026-07-23. This article was reviewed against the primary sources listed below. Unsupported first-person testing claims were removed unless they were backed by cited vendor material.
transmission signupstatus: open channel
article_topic // How to Secure Remote Access to a Homelab
Start building a smarter homelab.
Join readers learning Proxmox, networking, storage, backups, and self-hosting without breaking everything.
Enter your email address to receive the Homelab Addiction newsletter.
Beginner-friendly
No gatekeeping. Just clear, actionable guides.
1 useful email / week
Practical tips, real-world setups, and lessons learned.
Zero hype, practical only
What works, what breaks, and how to fix it.
Reply to any email with what you're building.
I read and reply to as many as I can.
— The Homelab Addiction Operator
support // the lab
Found this guide useful?
If it saved you time or a rebuild, you can support more practical homelab guides.