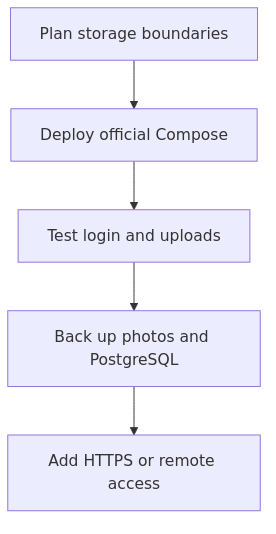
Immich is easiest to operate when its application, database, cache, and photo-library boundaries are explicit before containers start. The official deployment guidance is the source of truth for the supported Compose shape; this article turns that guidance into a storage-first homelab checklist.
Treat the photo library as durable data, PostgreSQL as a separately protected database, and Redis as replaceable runtime state. That separation makes upgrades, restores, and disk planning easier to reason about than one undifferentiated volume.
Decision flow grounded in the cited documentation.
Key Takeaways
Use the official Immich Compose example as the baseline and pin the deployment to a deliberate update process.
Place photo uploads and PostgreSQL data on storage with a tested backup path; do not confuse a container restart with a backup.
Add reverse proxy and external access only after local login, uploads, thumbnails, and database persistence work.
Why I am recommending Immich for beginners
There are several self-hosted photo tools worth knowing about, and we have already covered comparison angles like Immich vs PhotoPrism and Synology Photos vs Immich. For a first build, though, Immich keeps winning for one simple reason: it behaves like a modern product instead of a science project.
You get:
automatic mobile uploads
a polished web interface
multi-user support for family members
search and organization features people actually use
an official Docker Compose deployment path
strong momentum in the open-source community
That last point matters more than it sounds. A self-hosted app can be technically impressive and still be a bad beginner recommendation if updates are confusing, the mobile app is rough, or the docs assume you already know the whole stack. Immich is not perfect, but it has crossed the line from "interesting project" to "credible daily-use software."
What you need
Hardware expectations
For a first deployment, I would treat these as the practical minimums:
2 CPU cores
6 GB RAM preferred
local SSD storage for the database
enough storage space for your photo library and growth
Can you run it smaller? Sometimes, yes. Should you build your family's long-term photo library on a box that is already struggling to breathe? Probably not.
A useful mental model is this:
the database is the brain - it needs fast, consistent local storage
the photo library is the warehouse - it needs space, sensible backup, and room to grow
That is why the database should stay on local SSD storage even if your actual media eventually lives on a bigger disk or storage share. Putting PostgreSQL on a flaky network share is like keeping your index cards in a damp cardboard box while the books sit safely on a shelf. The books may be fine, but the thing that tells you where everything is can rot first.
Recommended gear if you are building this from scratch
If you want sensible beginner-friendly hardware lanes instead of endless shopping-tab paralysis, these are the three I would start with:
Samsung T7 portable SSD - a simple external target for secondary backups before you build a bigger backup stack: check Samsung T7 options on Amazon
APC Back-UPS battery backup - a surprisingly boring upgrade that matters when your photo server is writing data during a power blip: check APC Back-UPS options on Amazon
Step 1 - Prepare your Linux host
Why this matters
Immich is easiest to run when the host is boring. That is a compliment. You want a clean Ubuntu or Debian box, current packages, and predictable networking. Fancy comes later.
If you are deploying in Proxmox, create a VM with enough RAM and local SSD-backed storage. If you are new to VM templates and quick rebuilds, read How to Create and Manage Proxmox Templates after you get this first instance working.
transmission signup
article_topic // Immich Docker Setup
Don't leave without the setup notes.
Get practical homelab guides, failure logs, and beginner-friendly build notes in your inbox.
Enter your email address to receive the Homelab Addiction newsletter.
I strongly recommend either a DHCP reservation or a static IP for the host. Your phone app and browser bookmarks become much less annoying when the server address stops moving around.
What could go wrong
If you are building this inside a VM with too little RAM, the install may still complete, but machine learning jobs and thumbnail generation will feel rough. Do not mistake "it boots" for "it is healthy."
Step 2 - Install Docker the clean way
Why this matters
A lot of beginner Docker problems are not really Docker problems. They come from old distro packages, missing Compose support, or half-installed plugins. Using Docker's official repository removes a lot of avoidable friction.
Follow the official Docker Engine installation pattern for Ubuntu:
Keeping the stack in its own directory makes updates, backups, and troubleshooting much easier. You always know where the Compose file, environment file, and storage paths live.
I like using /opt/immich for the application files and a separate mounted location for the library if available.
If this is your very first pass, using paths under /opt/immich is also fine. Simplicity beats elegance on day one.
Step 4 - Download the official Immich Docker Compose files
Why this matters
Immich already publishes the Compose file and example environment file you want. Using the official files keeps your deployment closer to the docs, which makes updates and troubleshooting much easier later.
cd /opt/immich
wget -O docker-compose.yml https://github.com/immich-app/immich/releases/latest/download/docker-compose.yml
wget -O .env https://github.com/immich-app/immich/releases/latest/download/example.env
If you know your timezone, set it correctly. That keeps timestamps sane when you are browsing logs or checking upload times.
Why these specific settings matter
UPLOAD_LOCATION decides where your photo and video assets live
DB_DATA_LOCATION decides where PostgreSQL stores its data
TZ keeps the server aligned with your local time expectations
DB_PASSWORD protects database access inside the stack
If you want a strong database password quickly, generate one like this:
openssl rand -base64 24
Then paste only characters that behave cleanly in environment files. If you want zero drama, use a long alphanumeric value.
What could go wrong
Do not place the PostgreSQL data directory on a network share. The Immich team explicitly warns against this, and they are right. Media files are one thing. Database files are another.
This is the moment the stack becomes real. Docker Compose will pull the required images, create the containers, and start the services together.
From /opt/immich, run:
docker compose up -d
Check that everything started:
docker compose ps
Then follow the logs if something looks unhealthy:
docker compose logs -f
You are looking for containers that stay up rather than restarting in a loop.
A healthy docker compose ps output will usually show the services in a running state. If one service keeps crashing, stop and fix that before you try logging in through the web UI.
Common first-boot issues
docker: 'compose' is not a docker command - Compose plugin is missing
permissions errors on the storage path - directory ownership or mount permissions are wrong
healthcheck errors on very old Docker versions - update Docker from the official repo
port conflicts - something else is already bound to the required ports
Step 6 - Open Immich in your browser and create the admin account
Why this matters
A lot of beginners think the install is done when the containers start. It is not. The real test is whether you can actually reach the app, create the first account, and see the dashboard load properly.
Open:
http://YOUR-SERVER-IP:2283
If the page loads, create your admin account.
After login, spend two minutes checking the basics:
dashboard loads normally
storage path is working
no obvious warning banners
you can upload a test image from the browser
That tiny manual upload matters. It proves the stack is not only running, but actually writing data where you expect.
Step 7 - Set up your phone for automatic uploads
Why this matters
For most people, the whole point of a self-hosted photo platform is this one feature: take a picture on your phone, and it lands on your own server automatically.
Install the Immich mobile app on your phone, sign in with your server URL and account, and enable backup for the folders you want. Start with your main camera folder first. You can get more selective later.
Before you turn on every album and screenshot directory, do one small test batch. Back up a handful of recent images and confirm they appear in the web interface.
This is where Immich feels less like "some container app" and more like a real replacement for the cloud photo services people are leaving behind.
A practical beginner tip
Do not import your entire history, family shared folders, partner's phone, and old NAS dump all at once on day one. Start with one device and one account. Prove the workflow. Then scale up.
From the lab
Step 8 - Decide how you will access it safely
Why this matters
This is the step where people get impatient. They get the app running locally, then immediately ask how to expose it to the public internet. I get the temptation, but the safer beginner move is to slow down.
Your best first options are:
Local-only access on your home network
VPN access back into your network
Reverse proxy + HTTPS later, after the stack is stable
For a first family deployment, I would keep Immich local-only for a few days while you test uploads, imports, and backups. Then add remote access once you understand the moving parts.
That is not fear talking. It is just good sequencing.
Step 9 - Plan your backups before you trust the server
Why this matters
Self-hosting without backups is not privacy. It is optimism.
Immich stores value in two places:
the uploaded media files
the database and metadata that make the library searchable and organized
You need both.
At a minimum, I would define this early:
primary storage for the live library
secondary copy to external storage or another machine
a schedule for database-aware backups or host-level snapshots
That is not the final word on backup design, but it is better than promising yourself you will "set it up later."
If you already run a NAS or larger storage server, you can graduate to a cleaner 3-2-1 design later. The important thing is that your first backup exists before your first big upload wave.
Common mistakes beginners make with Immich
1. Treating container uptime like data safety
The app can be running perfectly while your backup strategy is nonexistent. A green dashboard is not a backup plan.
2. Putting the database on network storage
This is the big one. Large media files can live in slower places more safely than active database files can. Keep PostgreSQL local.
3. Exposing it to the internet too early
A stack you barely understand is not the place to begin experimenting with public exposure.
4. Importing everything on day one
Mass imports make it harder to tell whether your structure, permissions, and backup flow are correct. Start small, validate, then expand.
5. Forgetting storage growth
Photo libraries never stay the same size. If your family shoots 4K video, live photos, or years of phone backups, storage growth will sneak up on you.
A sensible beginner rollout plan
If you want the shortest path to a stable result, use this sequence:
Get the server running locally
Upload test photos from the web
Enable mobile backups for one device
Confirm files land where you expect
Set up the first backup target
Add a second user or second phone
Only then think about remote access and advanced features
That order matters because each step proves one layer of trust. You are not just turning on features. You are verifying that the stack behaves the way you think it does.
FAQ
How much RAM does Immich really need?
For a basic personal or small-family setup, I would aim for 6 GB RAM rather than trying to squeeze it into less. It may technically run smaller, but the user experience gets worse fast once indexing and machine learning jobs pile up.
Can I run Immich on a NAS instead of a mini PC or VM?
Yes, many people do. The real question is whether your NAS has enough CPU, RAM, and local storage behavior for the database. The safer answer for beginners is: if your NAS handles Docker cleanly and you understand the storage layout, it can work. If not, a small dedicated host is easier.
Do I need to expose Immich to the internet for phone backups to work?
No. Local-only backups work fine at home, and VPN access is often the better remote solution for beginners. Public exposure is optional, not required.
What is the easiest migration path from Google Photos?
Start by setting up Immich cleanly, test new mobile uploads first, then migrate older archives in batches. The mistake is trying to move everything before you trust the destination.
Is Immich enough on its own, or do I still need backups?
You still need backups. Immich is your photo platform, not your disaster recovery plan.
What to learn next
Once your first deployment is stable, these are the next upgrades that actually matter:
That is the bigger picture I want you to keep in mind. Immich is not just a photo app. It is often one of the first moments where self-hosting stops feeling theoretical and starts feeling personal. Your family pictures are not lab data. They are the kind of files that make you care about architecture, backups, and privacy for real.
And honestly, that is a good thing. The best homelab projects are not the ones with the fanciest diagrams. They are the ones that solve a real problem for you, quietly, every day.
Sources and verification
Primary documentation was checked before this update. Recheck the linked vendor documentation for version-specific changes before deployment.
transmission signupstatus: open channel
article_topic // Immich Docker Setup
Start building a smarter homelab.
Join readers learning Proxmox, networking, storage, backups, and self-hosting without breaking everything.
Enter your email address to receive the Homelab Addiction newsletter.
Beginner-friendly
No gatekeeping. Just clear, actionable guides.
1 useful email / week
Practical tips, real-world setups, and lessons learned.
Zero hype, practical only
What works, what breaks, and how to fix it.
Reply to any email with what you're building. I read and reply to as many as I can.
— The Homelab Addiction Operator
support // the lab
Found this guide useful?
If it saved you time or a rebuild, you can support more practical homelab guides.