Disclosure: This article may contain affiliate links. If you purchase through a link, we may earn a commission at no additional cost to you. Recommendations are matched to the documented requirements described below.
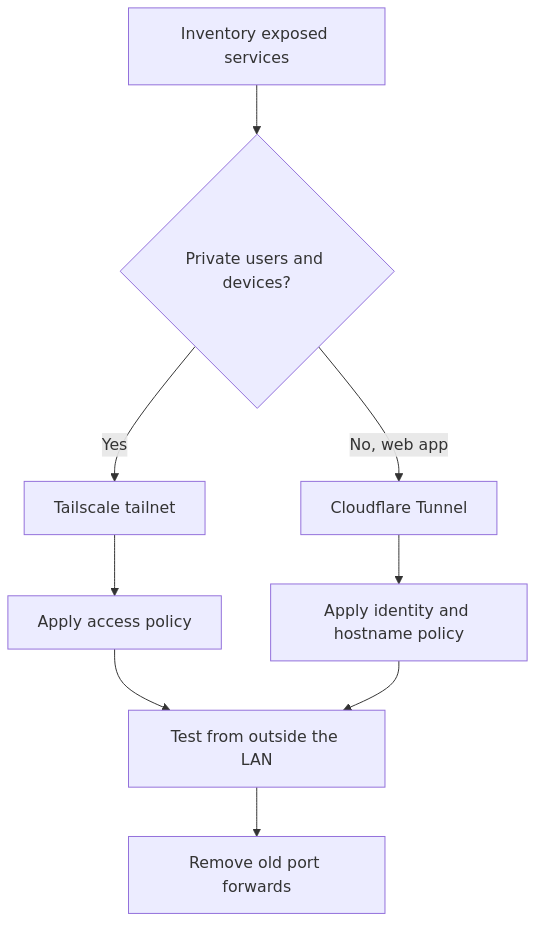
Migration flow for choosing, testing, and rolling back a replacement access path.
Replacing port forwarding is an access-model migration, not a single toggle. The safe choice depends on whether users need private device-to-device access or browser-friendly access to a specific web application.
Plan the new path, verify it from an external network, document the rollback, and remove the old exposure only after the replacement works.
Key Takeaways
Use Tailscale for private access between trusted devices and users.
Use Cloudflare Tunnel for browser-facing applications when inbound router ports should stay closed.
Test identity, DNS, origin reachability, and rollback before deleting old forwarding rules.
Why this matters before you touch any settings
A port forward is a router rule that sends traffic from your public internet connection to a device inside your home network.
That is not automatically reckless. Sometimes it is the only tool available. But it has a few beginner-hostile downsides:
it exposes a reachable entry point from the public internet
it depends on your router, ISP, firewall, DNS, and local service all staying aligned
it gets messy when your public IP changes or your ISP uses CGNAT (Carrier-Grade NAT)
it encourages publishing internal tools that were never designed to be internet-facing
That last point matters the most.
A lot of homelab services are comfortable on a private LAN and awkward on the open internet. A dashboard might have weak brute-force protection. A media stack might assume trusted users. An admin page might be technically reachable but still not something you want indexed, scanned, or attacked.
You do not need to become paranoid about every open port. You just want a cleaner rule:
private things stay private
public things go through a controlled edge
That is exactly where Tailscale and Cloudflare Tunnel help.
First decision: Tailscale or Cloudflare Tunnel?
Before you install anything, answer this one question:
Should this service be private to trusted devices, or should it be reachable in a normal browser from anywhere?
Choose Tailscale when:
you are the only user, or all users can install a client
you want private access to SSH, SMB, RDP, Proxmox, Unraid, or a dashboard
you want something that works well even behind CGNAT
you want to avoid exposing a hostname to the public internet
you care more about secure access than public sharing
Choose Cloudflare Tunnel when:
the service is a web app and should open in any browser
you want HTTPS on a real hostname without opening inbound ports
you do not want friends or family to install a VPN client
you want Cloudflare to sit in front of the app
you are publishing something intentionally, not just reaching it privately
Use neither by default when:
you are trying to publish a database, hypervisor admin panel, or other sensitive internal tool for general public access
you have not thought through authentication yet
you are using the tunnel to avoid fixing a deeper identity or authorization problem
If you are unsure, use this rule:
If the service is for you, start with Tailscale. If the service is for public browser access, start with Cloudflare Tunnel.
The migration checklist This guide recommends before any cutover
This is the part most tutorials skip, and it is the part that saves you from the most confusion later.
1. Inventory what the current port forward actually does
Write down:
public port
internal IP
internal port
protocol (TCP or UDP)
service name
who actually uses it
Example:
Public Port
Internal Host
Internal Port
Service
Who uses it?
443
192.168.1.20
443
Home Assistant
Just me
32400
192.168.1.30
32400
Jellyfin
Me and family
22
192.168.1.40
22
SSH on mini PC
Just me
This matters because different services should migrate in different ways.
transmission signup
article_topic // Replace Port Forwarding with Tailscale or Cloudflare Tunnel S…
Don't leave without the setup notes.
Get practical homelab guides, failure logs, and beginner-friendly build notes in your inbox.
Enter your email address to receive the Homelab Addiction newsletter.
Weekly only. No spam. Unsubscribe anytime.
2. Decide whether the service should be private or public
This sounds obvious, but it is the real decision.
SSH? Private.
Proxmox? Private.
NAS admin? Private.
A personal dashboard? Usually private.
A simple web app for family access? Maybe public through Cloudflare Tunnel.
3. Lower the blast radius before you migrate
Before you cut over, make sure the service itself is not depending on being wide open.
Good pre-migration cleanup:
remove default passwords
enable MFA where possible
confirm the app only listens where you expect
update the service before moving it
make a backup of the config if it matters
4. Test the replacement path before deleting the old forward
This is the big one.
Do not delete the port forward first and then start installing tools while you are away from home. Set up the new access method, confirm it works, and only then remove the old rule.
5. Remove the old forward and verify from outside your LAN
Once the new path works, delete the router rule and test again over mobile data or another outside network.
That last check is what proves you actually migrated instead of just adding another remote access path on top.
Path A - Replace a port forward with Tailscale
Tailscale is the easiest answer when the service should stay private.
The short version is simple: instead of opening your router to the internet, you join your devices to a private encrypted network called a tailnet. Your laptop, phone, and server can talk directly over Tailscale, and most of the time you do not need to open any inbound firewall ports at all.
According to the official docs, a standard Linux install looks like this:
curl -fsSL https://tailscale.com/install.sh | sh\nsudo tailscale up
After that, verify the device shows up and has Tailscale addresses:
tailscale ip\ntailscale status
Why Tailscale is usually the best first upgrade
For beginners, Tailscale removes three common pain points at once:
no router rule to maintain
no dynamic DNS headache for private access
no dependence on whether your ISP allows easy inbound traffic
The Tailscale firewall guidance also makes an important point: in most cases you do not need to open firewall ports manually. If direct peer-to-peer connectivity is difficult, Tailscale can still relay traffic. That may be slower than a direct path, but it still works.
Example migration: SSH on a mini PC
Let us say you currently forward public port 22 to 192.168.1.40:22 so you can SSH into a small Ubuntu box.
Here is the cleaner replacement:
1. Install Tailscale on the Ubuntu host.
2. Install Tailscale on the laptop you use remotely.
3. Sign both into the same tailnet.
4. Confirm the server appears in tailscale status.
5. SSH to the Tailscale name or IP instead of your home public IP.
#### Mistake 1: expecting it to publish a service publicly by default
Tailscale is private-first. That is its strength.
If your family needs a URL they can open from any browser without installing anything, private Tailscale access may not be the right fit.
#### Mistake 2: confusing Tailscale with router port forwarding
Tailscale does not usually need the same manual inbound rule maintenance. If you find yourself recreating old router habits immediately, stop and verify whether you actually need that extra complexity.
#### Mistake 3: ignoring relay status when performance matters
If a connection falls back to a relay, it can still work fine, but large media or file-transfer workloads may feel slower.
Check with:
tailscale status
If you see relay instead of direct, you may want to review firewall behavior or the environment described in the Tailscale firewall docs.
#### Mistake 4: disabling key expiry blindly on every server
The Tailscale docs explain that you can disable key expiry on always-on devices. That can be useful for stable servers, but treat it as a deliberate tradeoff, not a default checkbox.
Path B - Replace a port forward with Cloudflare Tunnel
Cloudflare Tunnel is better when the service should open in a normal browser without asking every user to join your private network.
The model is different from port forwarding.
With a traditional forward, traffic comes directly from the internet to your router and then into your network.
With Cloudflare Tunnel, a small agent called cloudflared runs on your server and creates an outbound-only connection to Cloudflare. Public traffic hits Cloudflare first, then Cloudflare sends it back through that existing tunnel to your local service.
That means:
no inbound router port needs to stay open
your origin IP does not need to be public
Cloudflare can sit in front of the service
The official docs describe the basic flow like this:
1. install cloudflared
2. create a tunnel in the dashboard
3. map a hostname to a local service
4. run the tunnel service with the provided token
When Cloudflare Tunnel is the right answer
Use it for:
a self-hosted web app friends or family need in a browser
a status page or internal tool you deliberately want web access for
a site or panel that should live behind a domain with HTTPS
It is especially attractive if your ISP uses CGNAT or you simply do not want router rules pointing inward.
Example migration: replace a forwarded web app
Say you currently forward port 443 to a dashboard at http://192.168.1.50:8080.
A Cloudflare Tunnel migration looks like this:
1. Make sure the app works locally first.
curl http://192.168.1.50:8080
2. In Cloudflare, go to Networking -> Tunnels -> Create Tunnel.
3. Choose the host OS and architecture.
4. Run the generated install command on the machine that will host cloudflared.
5. Add a Published application route such as:
- hostname: app.example.com
- service URL: http://192.168.1.50:8080
6. Confirm the tunnel shows Healthy.
7. Test the new hostname from outside your LAN.
8. Remove the old router port forward.
If you run the service in Docker, Cloudflare documents a container-friendly pattern like this:
docker run cloudflare/cloudflared:latest tunnel --no-autoupdate run --token <TUNNEL_TOKEN>
Important beginner warning: Tunnel does not replace authentication
This is the operational distinction to keep in view.
Cloudflare Tunnel is safer than raw port forwarding for a public web app, but it does not magically make every admin page a good public candidate.
Examples that should make you pause:
NAS admin panels
hypervisor management
database admin tools
anything with weak or shared credentials
If you expose something sensitive, add another layer such as Cloudflare Access or a stronger app-level login policy.
What could go wrong with Cloudflare Tunnel?
#### Mistake 1: using it for the wrong workload
Cloudflare Tunnel is great for web traffic. It is not the answer to every private protocol problem.
If what you really want is private device-to-device access, Tailscale is usually cleaner.
#### Mistake 2: forgetting the local service still has to work
If cloudflared points to http://localhost:8080, that origin still has to be reachable from the host where cloudflared runs.
Test locally first:
curl http://localhost:8080
If the host cannot reach the app, the tunnel cannot fix that.
#### Mistake 3: not accounting for outbound firewall rules
Cloudflare's configuration docs note that cloudflared connects outbound on port 7844. In restrictive environments, that matters. Tunnel removes inbound exposure, but it still needs working outbound connectivity.
#### Mistake 4: publishing the wrong hostname to the wrong service
This sounds silly until you do it once.
Double-check the route before deleting the old port forward. It is easy to point app.example.com at the wrong container or stale local port during a late-night migration.
From the lab
A practical decision table for common homelab services
Service
Better default choice
Why
SSH to a server
Tailscale
Private, device-based access is the natural fit
Proxmox UI
Tailscale
Sensitive admin panel, should stay private
TrueNAS / Unraid admin
Tailscale
Same reason - keep it off the public web
Jellyfin for just you
Tailscale
Private access is simpler and safer
Jellyfin for family on mixed devices
Cloudflare Tunnel or another deliberate publishing setup
Browser-friendly access may matter more than private mesh simplicity
What to choose in the most common beginner scenarios
If you are replacing a forwarded SSH port, Tailscale is the safer default.
If you are replacing a forwarded Proxmox or NAS admin port, Tailscale is the safer default.
If you want a friend or family member to open a web app in a normal browser without joining a private network, Cloudflare Tunnel is the relevant option.
If you are tempted to expose every admin panel through Cloudflare Tunnel because it feels more modern than port forwarding, the access model should be reconsidered.
That is the whole point of this migration. You are not just swapping tools. You are making a better boundary between private services and deliberately public ones.
Frequently Asked Questions
Should This guide uses Tailscale or Cloudflare Tunnel to replace port forwarding?
Use Tailscale when the service should stay private between trusted devices. Use Cloudflare Tunnel when a web app needs browser-friendly public HTTPS access without opening inbound ports on your router.
Do I need to open ports for Tailscale?
Usually no. Tailscale normally works without manual port forwarding. In harder network environments it can fall back to relay connectivity, which may be slower but still works.
Is Cloudflare Tunnel safer than port forwarding?
For web apps, yes in most homelab cases. It avoids exposing inbound router ports and keeps the connection outbound-only. You still need proper authentication, though, especially for admin interfaces.
What to learn next
If this migration helped, the next useful step is choosing a stable long-term remote-access model for the rest of your stack. These guides help you make that next decision cleanly:
The best remote access setup is not the one with the most features. It is the one that makes it obvious which services are private, which services are public, and why.
Sources and verification
Primary documentation checked before this revision:
Verification scope: source URLs were checked for reachability; article claims are framed as documentation-based guidance rather than private testing results.
transmission signupstatus: open channel
article_topic // Replace Port Forwarding with Tailscale or Cloudflare Tunnel S…
Start building a smarter homelab.
Join readers learning Proxmox, networking, storage, backups, and self-hosting without breaking everything.
Enter your email address to receive the Homelab Addiction newsletter.
Beginner-friendly
No gatekeeping. Just clear, actionable guides.
1 useful email / week
Practical tips, real-world setups, and lessons learned.
Zero hype, practical only
What works, what breaks, and how to fix it.
Reply to any email with what you're building. I read and reply to as many as I can.
— The Homelab Addiction Operator
support // the lab
Found this guide useful?
If it saved you time or a rebuild, you can support more practical homelab guides.