Tailscale vs WireGuard vs Cloudflare Tunnel for Homelabs: Choose by Access Model, Control, and Exposure Risk
Choose between Tailscale, WireGuard, and Cloudflare Tunnel by separating private device access, self-managed VPN control, and selective public web-app exposure.
Disclosure: This article may contain affiliate links. If you purchase through a link, HomelabAddiction may earn a commission at no additional cost to you.
Choose between Tailscale, WireGuard, and Cloudflare Tunnel by separating private device access, self-managed VPN control, and selective public web-app exposure.
The framework below turns primary documentation into practical choices, with explicit attention to maintenance, failure boundaries, and recovery rather than anecdotal recommendations.
Key Takeaways
Start with documented requirements and the actual operating model.
Separate configuration from verification and record the recovery path.
Prefer the smallest maintainable design that fits the workload.
The 30-second recommendation
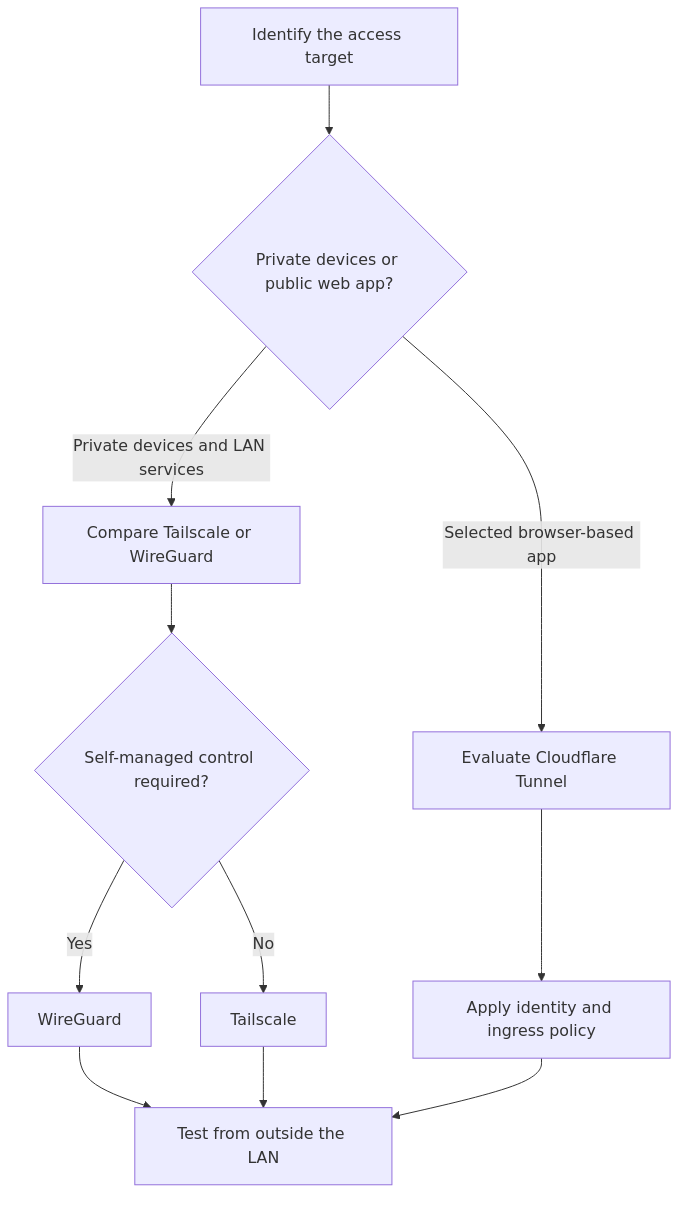
Here is the practical choice to make in each common homelab scenario:
You want the fastest, least painful way to reach your lab from your phone and laptop: pick Tailscale.
You want a fully self-managed VPN and you are comfortable with keys, routing, and port forwarding: pick WireGuard.
You want to publish a single web app like Immich, Jellyfin request UI, or a family dashboard without opening inbound ports: pick Cloudflare Tunnel.
You want to reach Proxmox, SSH, SMB, Docker admin panels, or your full private LAN: pick Tailscale or WireGuard, not Cloudflare Tunnel.
You want the most flexible stack overall: run Tailscale for private admin access and Cloudflare Tunnel only for the web apps you intentionally publish.
These tools are not solving the same job
This is where most remote-access comparisons get muddy.
Tailscale and WireGuard are both ways to extend your private network to trusted devices. They are about reaching machines and services that are supposed to stay private. That includes things like SSH, Proxmox, TrueNAS, SMB shares, RDP, your Docker host, and internal-only dashboards.
Cloudflare Tunnel is different. It is an application publishing tool. It creates an outbound connection from your network to Cloudflare and then exposes selected web apps through Cloudflare's edge. That is great when you want to publish one or two HTTP services without opening inbound ports. It is the wrong mental model if what you really need is private network access.
If you skip that distinction, you end up exposing admin panels that should have stayed private, or building VPN-style use cases on top of a tool that was never meant to replace a full private tunnel.
article_topic // Tailscale vs WireGuard vs Cloudflare Tunnel for Homelabs
Don't leave without the setup notes.
Get practical homelab guides, failure logs, and beginner-friendly build notes in your inbox.
Enter your email address to receive the Homelab Addiction newsletter.
Weekly only. No spam. Unsubscribe anytime.
Criteria
Tailscale
WireGuard
Cloudflare Tunnel
Best job
Private remote access for most homelabs
Fully self-managed private VPN
Publishing selected web apps
Inbound port required
Usually no
Usually yes
No
Handles CGNAT well
Yes
Usually no, unless you add a VPS or relay design
Yes for web apps
Full LAN access
Yes, with subnet routers
Yes, with routing you configure
No
SSH / SMB / RDP / Proxmox
Yes
Yes
Not a natural fit
Arbitrary TCP/UDP protocols
Yes
Yes
Limited and web-first
Identity and policy layer
Built-in ACLs and device identity
You build it yourself
Cloudflare Access for web apps
Operational overhead
Low
Medium to high
Low to medium
Third-party dependency
Control plane dependency unless you self-host Headscale
None
Strong Cloudflare dependency
Best default winner
Yes
Only if you want full control
Only if you are publishing apps
Evaluation framework
This comparison is not treating this as a generic feature checklist. This guide scores each option against the same homelab requirements that matter when a lab leaves the house:
1. Can you reach the lab from ugly real-world networks?
2. Can you protect admin surfaces without turning them into public web apps?
3. Can you handle CGNAT, hotel Wi-Fi, LTE, and double NAT without a weekend of workarounds?
4. Can you support more than one user or device without creating key-management debt?
5. Can you reach non-web services cleanly?
6. Can you keep the setup understandable six months from now?
That framework matters more than theoretical crypto debates because most homelab remote-access failures are operational. They come from brittle routing, unclear exposure boundaries, or a setup that only the original builder understands.
Tailscale: the best default for most homelabs
Tailscale sits on top of WireGuard, but the operational difference is massive. Instead of hand-managing keys, listening ports, peer configs, and Dynamic DNS, you install the client, authenticate the device, and let the control plane coordinate the mesh.
If you already know you like the Tailscale access model but you are unsure about the hosted control plane, read Headscale vs Tailscale for Homelabs. That companion guide focuses on when self-hosting the coordination layer is actually worth the extra work.
For most personal homelabs, that is exactly the right trade.
Where Tailscale wins
CGNAT and awkward networks - Tailscale is far more forgiving when your ISP does not give you a friendly public IP path.
Multi-device access - adding your laptop, phone, tablet, travel machine, and a family member is dramatically easier than maintaining raw peer configs.
Subnet access - you can publish a subnet router and reach services that are not running the Tailscale client directly. The official subnet router docs are worth reading before you expose an entire VLAN.
Identity-aware access - device identity and ACLs are much cleaner than trying to bolt equivalent controls onto a raw VPN by hand.
Exit nodes and travel use - the official exit node docs are useful if you want a stable home egress path from untrusted networks.
Where Tailscale falls short
You are depending on an external control plane unless you move to Headscale.
If you want maximum self-sovereignty, the metadata and coordination dependency may bother you.
If your use case is a tiny, fixed site-to-site tunnel with known endpoints, Tailscale can feel like more platform than you actually need.
Best fit for Tailscale
Pick Tailscale if:
your ISP uses CGNAT or Starlink-like connectivity
you want remote access for several devices without ongoing peer maintenance
you want secure private access to Proxmox, Docker, NAS, SSH, and internal dashboards
you want the easiest bridge between your lab and your day-to-day devices
For most readers, this is the winner.
WireGuard: the best pure self-managed VPN option
WireGuard is still the cleanest answer when you want a fast, minimal, self-managed tunnel with no external control plane in the middle. If you already have a public IP, solid Dynamic DNS, and you are comfortable managing peers, it remains an excellent homelab choice.
WireGuard remains a strong fit for people who value control over convenience.
Where WireGuard wins
You own the whole path - keys, endpoints, routing, and firewall policy all live under your control.
Performance ceiling - WireGuard is lightweight and direct. If you care about squeezing the most out of your line rate or keeping the stack very lean, that matters.
Site-to-site and appliance-style use - if you are linking fixed locations or using router/firewall gear with first-class WireGuard support, the design stays simple.
No third-party dependency - the tunnel works on your terms once it is configured correctly.
Where WireGuard gets expensive operationally
Port forwarding and public reachability - raw WireGuard usually wants a reachable inbound path.
Key and peer management - this is easy at two peers and steadily less fun at ten.
CGNAT pain - if your home connection is behind CGNAT, a plain WireGuard server is no longer the easy answer.
User management - revocation, device churn, and family-friendly onboarding all take more work.
If you want a practical setup guide after reading this comparison, the WireGuard on Docker guide walks through a beginner-friendly deployment, and the comparison criteria below explain why WireGuard is usually the cleaner protocol starting point when you want a self-managed VPN for a homelab.
Best fit for WireGuard
Pick WireGuard if:
you want a fully self-managed VPN with no cloud control plane
you have a public path into your lab or a routing design that already solves reachability
you need a straightforward site-to-site or fixed-peer tunnel
you are comfortable with keys, firewall rules, and ongoing config hygiene
Cloudflare Tunnel: great for selected web apps, wrong for full private access
Cloudflare Tunnel is the tool A reasonable default is when someone says, "I want a family to reach one or two web apps without me opening inbound ports on the router."
That is a completely valid job. It is just not the same job as private network access.
Very friendly for browser-based apps like dashboards, request portals, notes, and other HTTP services
Good separation between public and private layers if you use it carefully
Where Cloudflare Tunnel stops being the right answer
You want full-LAN reach or non-web protocol access.
You want SSH, SMB, RDP, hypervisor management, or arbitrary internal services without reshaping them into a web-publishing workflow.
You are tempted to put sensitive admin panels on the public side just because Cloudflare makes exposure easier.
That last one is the trap.
A lot of homelabbers think Cloudflare Tunnel is "safer than a VPN" in every scenario. It is safer than sloppy port forwarding for published web apps. It is not a better answer than a private VPN when the service should never have been published at all.
you want to publish a small number of browser-based apps
you do not want to open inbound ports
you want identity checks in front of those apps
you are comfortable treating this as app exposure, not network extension
From the lab
The real fork in the road: CGNAT and access scope
If your homelab sits behind CGNAT, hotel Wi-Fi, or a mobile-heavy access pattern, the comparison gets much simpler.
Tailscale becomes the obvious first recommendation because it handles ugly network edges far more gracefully.
WireGuard usually needs extra help, such as a VPS bounce point, a public endpoint elsewhere, or more careful routing design.
Cloudflare Tunnel still works fine for web apps, but it does not solve private network access.
If your homelab has a clean public path and you actively want to avoid external control planes, WireGuard gets much more attractive.
So the question is not just "Which product is best?" It is also:
Do you have CGNAT?
Do you need full private access or only web publishing?
Do you value simplicity more than control?
Are you securing one operator, a household, or a small team?
Which one should you choose by scenario?
1. Solo homelab admin behind CGNAT
Pick: Tailscale
This is the cleanest win in the entire comparison. You get private access to Proxmox, Docker, your NAS, and SSH without spending the weekend engineering around your ISP.
2. Public-IP homelab with a strong self-management preference
Pick: WireGuard
If you already have the network conditions and the temperament for manual control, raw WireGuard is lean, fast, and predictable.
3. Family access to a few friendly web apps
Pick: Cloudflare Tunnel
For a photo gallery, a dashboard, or a note-taking app, Cloudflare Tunnel is easier to hand off than a full VPN. Just stay disciplined about what belongs on the published side.
4. Full private access to Proxmox, NAS, SSH, and internal services
Pick: Tailscale or WireGuard
Cloudflare Tunnel is not the right tool here.
5. Best all-around stack for a growing homelab
Pick: Tailscale for private admin access, Cloudflare Tunnel only for the specific web apps you intentionally publish
That mixed model is what A reasonable default is most often because it keeps the exposure boundary easy to understand.
Recommended gear that makes remote access less fragile
If you are building remote access seriously, a few small hardware choices make the whole thing more reliable.
Travel client router: a GL.iNet travel router with WireGuard support is useful when you want a stable remote client for hotels, temporary setups, or testing full-device access.
Edge appliance for self-managed VPNs: a 2.5GbE fanless firewall appliance makes WireGuard more comfortable when you want a clean router-side deployment.
Identity hardening: a YubiKey hardware security key is one of the best upgrades you can make if your remote-access stack depends on identity platforms.
Power stability: an APC Back-UPS 1500VA is boring in the best way. Remote access stops being impressive the first time a power flicker takes down your edge node.
Final verdict
If you want a single default answer, Tailscale wins this comparison for most homelabs.
It solves the real problem most people have: reaching private services securely from unreliable networks without turning network engineering into a side hobby. It handles CGNAT better, reduces peer-management overhead, and gives you a safer default path for a growing lab.
WireGuard is the better answer when control matters more than convenience and you are willing to operate the plumbing yourself.
Cloudflare Tunnel is the better answer when the service you want to expose is a browser-based app and you are intentionally publishing it, not extending your private network.
That is the cleanest way to think about it:
Tailscale for the best default private access model
WireGuard for the best self-managed VPN model
Cloudflare Tunnel for the best published-app model
And if you are trying to force one tool to do all three jobs, that is usually the sign you should split the design instead.
Frequently Asked Questions
Is Tailscale just WireGuard?
Not exactly. Tailscale uses WireGuard for the encrypted data plane, but it adds device identity, key coordination, NAT traversal, DNS, ACLs, and easier multi-device management on top.
Can Cloudflare Tunnel replace a VPN for a homelab?
No, not completely. It is a strong tool for publishing selected HTTP services, but it is not the right replacement for private access to SSH, SMB, hypervisors, RDP, or full-LAN workflows.
What should I choose if my ISP uses CGNAT?
Tailscale is usually the best first move because it tolerates NAT-heavy environments much better than a basic self-hosted WireGuard server. Cloudflare Tunnel can still help for web apps, but it does not replace private network access.
Should the guide uses both a VPN and Cloudflare Tunnel?
Often, yes. Use Tailscale or WireGuard for private operator access, then use Cloudflare Tunnel only for the small number of web apps you intentionally want to publish.
Sources and verification
Primary documentation checked before this revision: