Disclosure: This article may contain affiliate links. If you purchase through these links, we may earn a commission at no additional cost to you. We only recommend products and services that can be supported by cited vendor documentation, product specifications, or other primary sources. No hands-on testing is claimed here unless explicitly stated.
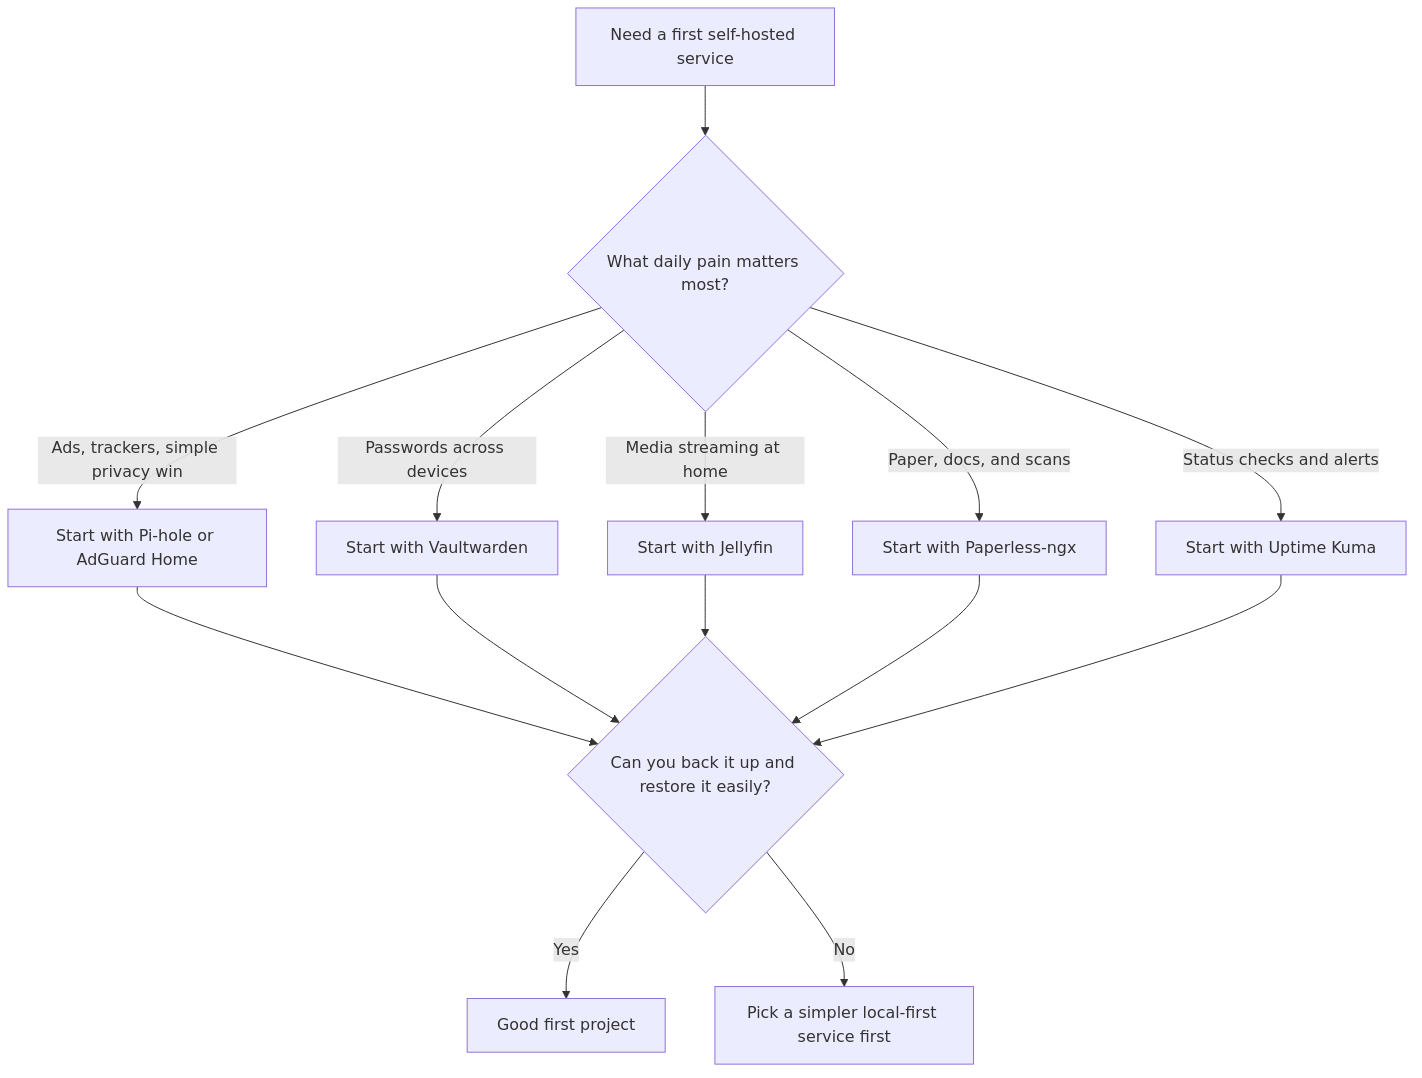
What should you self-host first? Start with a service that improves daily life, stays private on your home network, and has a backup and restore path you can actually test.
The best first self-hosted services are useful without being internet-facing. DNS ad blocking, password management, dashboards, photo backup, media, notes, and monitoring all make sense when matched to the problem you want to solve.
This guide compares seven beginner-friendly self-hosted services by daily usefulness, privacy benefit, exposure risk, and backup complexity so you can choose one realistic first project instead of starting with the most complicated stack.
First self-hosted service triage: start with the daily problem you want to remove, then favor the option that is local-first, low-risk, and easy to restore.
What to self-host first (the quick decision rule)
If you only pick one, pick something that improves your daily life without being internet-facing.
A great first target is local-only, low-risk, and easy to roll back.
1) DNS ad blocking (Pi-hole or AdGuard Home)
DNS ad blocking is one of the highest ROI things you can run at home. You set it up once, then every device benefits.
A small self-hosted app you use daily is more important than a complex app you open once a month.
Linkding is a great example because it is simple, fast, and easy to back up.
7) Monitoring (Uptime Kuma)
Once you run more than a couple services, you want to know when something is down.
Uptime Kuma is lightweight and makes failures obvious without needing an enterprise monitoring stack.
How to choose your first self-hosted app
The best self-hosted apps are not automatically the most powerful ones. They are the ones that solve a problem you already have while keeping the first failure easy to understand and recover from.
Use four questions before you install anything:
Will I use it every week? A service that replaces a real daily habit is easier to maintain than a dashboard you only open during setup.
What happens if it stops? Prefer a service that causes inconvenience rather than a full household outage while you are learning.
Where does the important data live? Identify the database, uploads, configuration, secrets, and any encryption keys before you create the first account.
Can I keep it private? Start on the LAN. Public access adds DNS, HTTPS, authentication, patching, and abuse concerns that are separate from learning the application itself.
Quick comparison: the best first self-hosted apps by goal
Goal
Good first choice
Why it fits
What to learn first
Data and risk note
Reduce ads and trackers on your home network
Pi-hole or AdGuard Home
Immediate household value and a local-first design
DNS settings, upstream resolvers, and recovery if DNS is unavailable
Keep a second DNS path while testing so one mistake does not disconnect every device
Improve password management
Vaultwarden
High privacy value with a small, focused service
HTTPS, account protection, admin-token handling, and encrypted backups
It contains sensitive data. Do not expose it casually or treat a container snapshot as the whole backup
Organize the homelab
Homepage, Homarr, or Linkding
Low operational pressure and useful for learning links and service discovery
Volumes, configuration files, and simple restore procedures
Usually low risk, but do not put secrets in dashboard links or bookmark descriptions
Protect a growing photo library
Immich
Strong long-term value when photo backup is the actual problem
Storage paths, database backups, mobile upload behavior, and restore testing
Photo data is valuable and often irreplaceable. Plan a second copy before moving a library
Stream an existing media library
Jellyfin
Clear feedback and a practical reason to keep using the service
Media mounts, user access, hardware-transcoding expectations, and updates
Keep the media library separate from the app configuration and metadata backups
Know when services are down
Uptime Kuma
Useful after the first few services and simple to understand
Monitor targets, notification channels, and false-positive handling
Monitoring does not make a service reliable. It only makes failure visible
These are not rankings from a universal benchmark. They are starting points matched to different jobs. A service with a low installation barrier can still have a high data-recovery responsibility, so choose based on the problem you want to solve rather than the number of features in the project README.
transmission signup
article_topic // What to Self-Host First
Don't leave without the setup notes.
Get practical homelab guides, failure logs, and beginner-friendly build notes in your inbox.
Enter your email address to receive the Homelab Addiction newsletter.
Weekly only. No spam. Unsubscribe anytime.
A safer build order for a new homelab
If you are starting from zero, build in layers instead of installing seven self-hosted apps in one weekend.
Phase 1: learn the host and the container
Begin with one low-risk service such as Pi-hole, AdGuard Home, a dashboard, Linkding, or Uptime Kuma. Learn where the Compose file lives, where persistent volumes are mounted, how logs are read, and what a clean update looks like.
Docker containers are not backups by themselves. The application state normally lives in volumes or bind-mounted directories, while the Compose file and environment file describe how to recreate the service. Keep those pieces together and document the path before adding the next app.
Phase 2: add a service with meaningful data
Once the first service is stable, add Vaultwarden, Immich, or another app whose data matters. Before creating real data, write down:
the persistent directories and database location
the configuration and secret-management method
the backup destination and retention period
the restore steps on a temporary path or separate host
how you will update the app and roll back if the update fails
The homelab backup strategy guide explains how to separate live service state, fast local recovery, and an encrypted offsite copy. That separation matters more than whether the first app is running on a mini PC, a NAS, or a virtual machine.
Phase 3: expose only what has a reason to be public
Keep the application on the LAN until you understand its accounts, update process, and recovery path. When remote access becomes necessary, use the smallest boundary that fits the job. A private VPN is usually a better starting point for administration than publishing every app through a reverse proxy.
What to prepare before installing self-hosted apps
A small amount of preparation prevents most beginner frustration.
Storage
Separate application data from disposable container layers where possible. Photos, databases, documents, and media should have an identified storage path with enough headroom for growth. A full disk can look like an application bug, a database failure, or a broken update, so leave room for temporary files and logs.
Backups
Back up the data the app cannot recreate. That usually means more than the Compose file: include uploads, databases, configuration, encryption keys, and account-recovery material. A backup is not finished until you have restored something from it.
Updates
Record the current image tag or release, read the upgrade notes, and keep a rollback path. Avoid updating every service at once. One change at a time makes the failure boundary obvious and gives you a clean before-and-after comparison.
Access
Use a password manager, unique credentials, and HTTPS when credentials cross an untrusted network. Do not paste long-lived admin tokens into public screenshots, dashboard URLs, or shared Compose files. If a service has an admin interface, keep it on the LAN or behind a private access layer until you have a specific reason to publish it.
Which self-hosted apps should you avoid starting with?
Avoid starting with the service that combines the highest data value, widest public exposure, and most complicated recovery story. That often includes public email, internet-facing identity systems, large multi-container stacks, or anything that requires you to understand DNS, reverse DNS, certificates, spam controls, and abuse handling before you can use it safely.
That does not make those projects bad. It makes them poor first projects. Learn the basic loop - install, configure, back up, update, restore, and monitor - on something forgiving first. Then move to the service that genuinely earns its place in your homelab.
If you are unsure, use this rule: start with the smallest self-hosted app that removes a real annoyance, keep it private, and prove that you can restore it before adding more.
The 3 mistakes that make beginners quit
Mistake 1: starting with an internet-facing app
Keep your first wins inside your LAN.
When you go public, the security and networking requirements jump.
Mistake 2: not knowing where your data lives
Before you celebrate, answer this: If this server dies tonight, what do I restore and from where?
Mistake 3: doing too many things at once
Pick one service. Make it boring and stable. Then add the next.
FAQ
What to self-host first if I am a complete beginner?
Start with DNS ad blocking or a dashboard. They are low-risk and give you a quick win.
What to self-host first for privacy?
A password manager and photo backup are strong privacy wins, but only if you back them up properly.
What to self-host first on a Raspberry Pi?
Pi-hole, a dashboard, and Uptime Kuma are all reasonable first services on small hardware.
What should I avoid self-hosting first?
Avoid anything internet-facing or state-heavy without a backup plan. Those projects fail for beginners the most.
Next steps
Pick one service from this list and set it up in the simplest way possible. Before you move on, write down your backup and restore steps in plain language.
If you can restore it after deleting the container or rebooting the VM, you have built a real homelab skill.
Sources and verification
Last verified: 2026-07-23. This article was reviewed against the primary sources listed below. Unsupported first-person testing claims were removed unless they were backed by cited vendor material.