

If you are starting a homelab, Docker feels like magic right up until something breaks and you realize you do not know where your data lives.
This post is meant to fix that. You do not need every Docker feature. You need the small set of ideas that make deployments predictable, upgrades safe, and restores boring.
In this guide you will learn:
- The difference between an image and a container (and why it matters)
- Where your data should live (volumes vs bind mounts)
- How Docker networking works at a practical level
- Why Docker Compose becomes your homelab control panel
The one-sentence mental model
A Docker image is the blueprint. A container is the running instance. A volume is where the data lives.
Once that clicks, most day-to-day Docker decisions become obvious.
Images vs containers (blueprint vs running app)
An image is a packaged filesystem plus metadata. You can think of it like a read-only template for an app.
A container is a running instance of that image. You can start it, stop it, delete it, and recreate it.
The key point for homelabs is this:
- You should be able to delete and recreate containers without losing your important data.
If deleting a container makes you panic, the service is not set up with clear persistent storage yet.
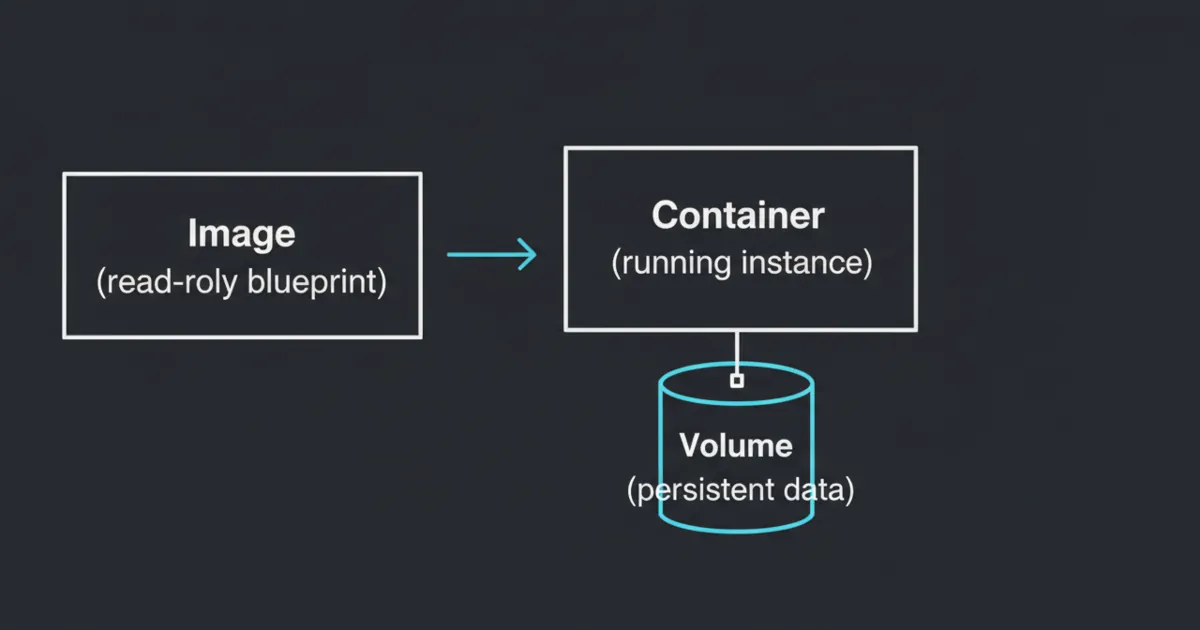
Where your data lives (volumes vs bind mounts)
Docker gives you two common ways to keep data persistent: volumes and bind mounts.
Volumes
A volume is storage managed by Docker.
A practical way to think about it:
- Volumes are for app data you want Docker to manage.
- You interact with them through Docker and back them up as a unit.
Docker’s own documentation calls volumes the preferred mechanism for persisting container data and notes they are managed by Docker and isolated from the host’s core filesystem layout.
Bind mounts
A bind mount maps a specific host directory into a container.
Bind mounts are great when:
- You want your configs in a predictable folder you can browse and back up
- You want to edit files on the host and have the container use them immediately
A common homelab pattern is:
- Bind mount config
- Use a volume (or a dedicated host path) for large data directories
The important rule is not which one you choose. It is that you choose deliberately and can point to the exact path that must be backed up.
Docker networking in homelab terms
Most homelab Docker setups work fine with the defaults, but you should understand the three patterns you will see:
Bridge networking (the default)
Containers sit behind a private network on the host. You publish ports from host to container.
This is usually the easiest to keep tidy, and it avoids surprises on your LAN.
Host networking (powerful, but blunt)
The container uses the host network stack directly.
This can be useful for certain services, but it removes a layer of isolation and makes port conflicts easier.
LAN-style networking (containers act like separate machines)
Some people want containers to look like they have their own IP on the LAN.
That is possible, but it adds complexity. For beginners, start with bridge mode and a reverse proxy.
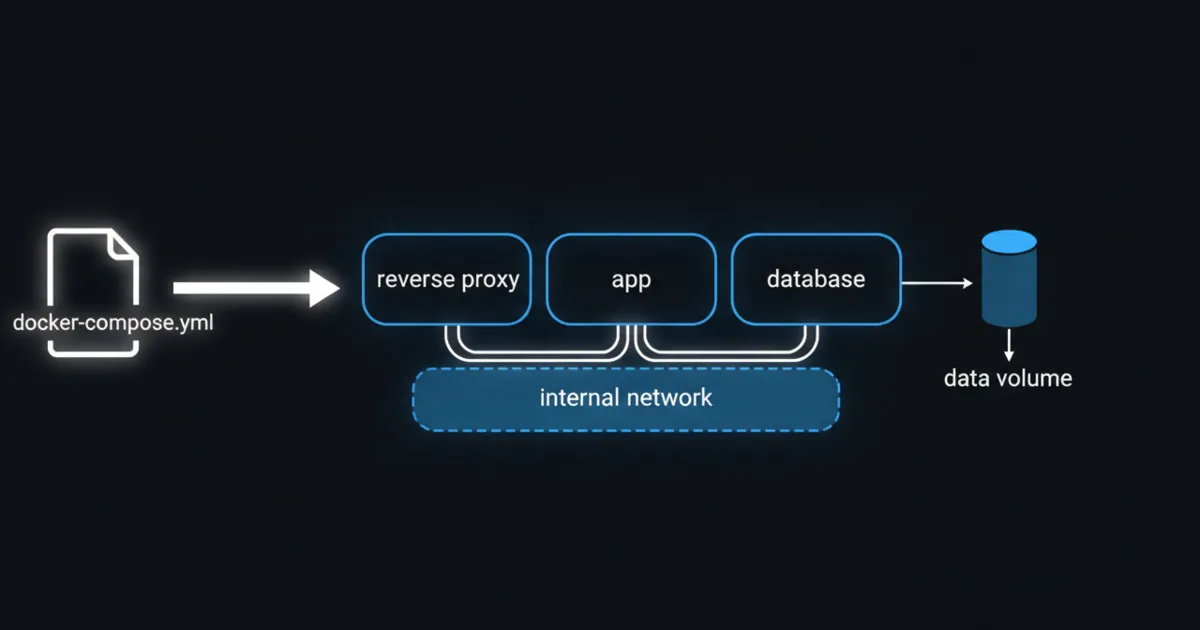
Docker Compose: your homelab control panel
Once you run more than one or two containers, Compose becomes the simplest way to:
- Document your setup
- Recreate it after a failure
- Upgrade services predictably
A Compose file is basically your homelab recipe.
It captures:
- Which images you run
- Environment variables
- Volumes and bind mounts
- Networks
- Restart policies
A simple default layout that stays maintainable
The biggest quality-of-life upgrade is having a consistent folder layout for your stacks.
One practical approach:
- One folder per stack
- A compose file in that folder
- A config subfolder you can back up
You do not need to copy a perfect structure from the internet. You just need a structure you will keep.
Common beginner mistakes
Mistake 1: storing data inside the container
If you store important data in the container writable layer, deleting the container will delete your data.
Make sure you can recreate the container from Compose and the service comes back with its data.
Mistake 2: pulling latest forever
Using latest everywhere makes upgrades unpredictable.
Pin versions for anything you care about, and upgrade on purpose.
Mistake 3: exposing random ports on your LAN
It is tempting to publish ports directly for every service.
A reverse proxy gives you clean URLs and one place to manage inbound access, which keeps your setup less chaotic.
FAQ
Should I run Docker on bare metal or inside a VM?
Both work. Many homelabs run Docker inside a dedicated VM so the host stays clean and the services are easier to snapshot and restore.
Do I need Kubernetes for a homelab?
Not for most people. Compose is enough for a long time.
Are volumes or bind mounts better?
Volumes are simpler to manage through Docker. Bind mounts are simpler when you want direct host access to files. Pick one intentionally and back it up.
What should I learn next?
Learn how you will back up and restore a single service. That is the moment Docker stops feeling risky.
Next steps
Pick one service you want to self-host and write a Compose file for it. Before you run it, decide where its config and data will live and how you will back it up.
If you can recreate the container from scratch and your data is still there, you have learned the most important Docker skill for homelabs.