Disclosure: This article may contain affiliate links. If you purchase through a link, HomelabAddiction may earn a commission at no additional cost to you.
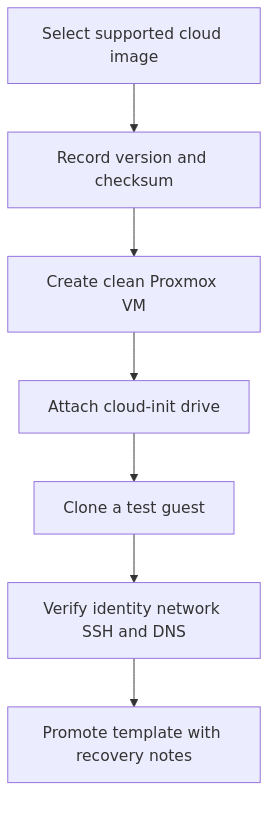
Use a documentation-led workflow for repeatable Proxmox cloud-init VM templates, from image selection through first-clone validation.
The framework below turns primary documentation into practical choices, with explicit attention to maintenance, failure boundaries, and recovery rather than anecdotal recommendations.
Key Takeaways
Start with documented requirements and the actual operating model.
Separate configuration from verification and record the recovery path.
Prefer the smallest maintainable design that fits the workload.
Why cloud-init templates beat manual installs every single time
A Proxmox template gives you a reusable VM base image. Cloud-init gives that image a first-boot brain.
That means each clone can get its own hostname, user, SSH keys, DNS, and network config without you remastering the disk every time. It is the difference between copying a machine and provisioning a machine.
In practical homelab terms, that buys you four things:
Speed - you can deploy a fresh Linux VM in minutes, sometimes seconds.
Consistency - every guest starts from the same sane baseline.
Safer troubleshooting - if a clone drifts, you can destroy it and recreate it instead of nursing a broken pet VM back to health.
Better automation later - Terraform, Ansible, and scripts become much more useful when the starting point is predictable.
You are not just making a template. You are defining the default personality of every future Linux VM in your lab.
A sensible default is one gold-standard Ubuntu template, proving it works cleanly, and only then adding more distros or custom user-data.
What you need before you start
Keep this simple.
You need a working Proxmox node, storage for the VM disk and cloud-init drive, and a Linux cloud image from a distribution that actually supports cloud-init properly. Ubuntu and Debian are the least dramatic places to start.
You should also have:
a bridge already configured, usually vmbr0
an SSH public key ready to inject
enough storage to keep one template plus its clones
Clone from it and only then decide whether you need advanced cicustom data.
That order matters.
transmission signup
article_topic // Proxmox Cloud-Init Templates
Don't leave without the setup notes.
Get practical homelab guides, failure logs, and beginner-friendly build notes in your inbox.
Enter your email address to receive the Homelab Addiction newsletter.
Weekly only. No spam. Unsubscribe anytime.
If you start layering in custom YAML, package installs, and static addressing before you prove the plain template works, you are increasing your troubleshooting surface area for no reward.
Step 1: Download a cloud image
I will use Ubuntu 24.04 here because it is common, well-supported, and generally well-behaved with cloud-init.
On your Proxmox host:
cd /var/lib/vz/template/iso
wget https://cloud-images.ubuntu.com/noble/current/noble-server-cloudimg-amd64.img
ls -lh noble-server-cloudimg-amd64.img
You can use Debian instead if that is your house standard. The workflow is basically the same.
Why this matters: cloud images are already prepared for first-boot customization. You are not starting from a generic installer ISO and trying to force automation onto it afterward.
Step 2: Create the base VM shell in Proxmox
Pick a VM ID that clearly signals “template.” Operators can use the 9000 range for templates because it keeps the inventory visually obvious.
--agent enabled=1 gives you much better visibility and shutdown behavior later.
--serial0 socket plus --vga serial0 plays nicely with many cloud images.
virtio-scsi-pci is the controller Proxmox itself recommends for many Ubuntu cloud-image workflows.
A common template mistake
Skipping the guest agent because it can be added later is technically possible but creates avoidable cleanup work. If you know every clone should have it, bake it into the baseline assumptions from the start.
Step 3: Import the cloud image and attach it properly
Now import the downloaded disk into your chosen storage. Replace local-lvm with your actual VM storage.
qm importdisk 9000 noble-server-cloudimg-amd64.img local-lvm
qm set 9000 --scsi0 local-lvm:vm-9000-disk-0
qm set 9000 --ide2 local-lvm:cloudinit
qm set 9000 --boot order=scsi0
That ide2 cloud-init drive is not optional. It is the delivery vehicle Proxmox uses to pass first-boot metadata into the guest.
If you forget it, the template might still boot, which is honestly rude because it delays the moment you realize nothing was applied.
Step 4: Add the defaults that should exist on every clone
This is the stage where cloud-init starts earning its keep.
Start with a minimal, sane baseline:
qm set 9000 --ciuser marcus
qm set 9000 --sshkeys ~/.ssh/id_ed25519.pub
qm set 9000 --ipconfig0 ip=dhcp
qm set 9000 --nameserver 1.1.1.1 --searchdomain home.arpa
If your SSH public key lives somewhere else, point Proxmox at that file instead.
Why DHCP is a sensible first choice
Because it reduces variables.
Most people who have “cloud-init is broken” moments are actually dealing with static IP syntax mistakes, wrong gateways, VLAN mismatches, or firewall issues. DHCP lets you validate the template itself before layering on network complexity.
Once the clone boots, gets a lease, shows up in your DHCP server, and accepts your SSH key, then you can move on to static assignments confidently.
If your environment really requires static IPs at clone time, use this format:
qm set 9001 --ipconfig0 ip=192.168.30.41/24,gw=192.168.30.1
That command is for the clone, not the template. Keep the template generic whenever possible.
Step 5: Resize the disk before converting to a template
Cloud images are intentionally small. That is fine for the image. It is not fine for actual use.
Resize the disk while the VM is still your template base:
qm resize 9000 scsi0 32G
Cloud-init can usually grow the filesystem on first boot, which is exactly what you want. A clone starts small, sees a larger virtual disk, and expands into it without you doing surgery later.
If you are planning database-heavy or Docker-heavy workloads, size accordingly. My default general-purpose Linux VM template is usually 32G or 40G.
Step 6: Boot it once only if you need to validate the guest image
There are two valid schools of thought here.
One is “never boot before templating.” The other is “boot once, confirm cloud-init and guest-agent behavior, then clean up and template.” I land in the second camp because the guide uses verifying reality over trusting vibes.
If you want to validate the image path:
qm start 9000
qm terminal 9000
Or inspect from the console in the Proxmox UI.
Check for:
cloud-init present
the guest booting cleanly
serial console behaving normally
QEMU guest agent installed or installable
Inside the guest, I often confirm:
sudo systemctl status cloud-init
sudo systemctl status qemu-guest-agent
cloud-init status --wait
If the cloud image does not already include the guest agent, install it before you finalize the template:
Not every distro needs every one of those steps in the same way, but the principle is the same: do not freeze unique guest identity into a template unless you enjoy strange clones later.
Step 8: Convert the VM into a template
Once the base image is clean, shut down, and configured, convert it:
qm template 9000
That is the easy part.
The real value shows up when you clone it correctly.
Step 9: Clone and personalize the new VM
Here is a real example of creating a new VM from the template:
qm set 9101 --ipconfig0 ip=192.168.30.51/24,gw=192.168.30.1
qm start 9101
Then verify from the Proxmox side:
qm guest exec 9101 -- ip a
qm guest exec 9101 -- hostnamectl
Or just SSH in the normal way.
This is the point where templates start paying rent. You are no longer installing Linux. You are issuing new instances.
From the lab
When the built-in cloud-init tab is enough
For most homelabbers, the default Proxmox cloud-init options are enough for 80 percent of workloads.
Use the built-in tab if you mainly need:
SSH key injection
default username
DHCP or static IP assignment
DNS settings
basic password injection for edge cases
That covers general-purpose app hosts, utility VMs, jump boxes, test nodes, and a surprising amount of day-to-day infrastructure.
If your next step after cloning is usually “install Docker and deploy Compose files,” this standard workflow is already a big win. Pair it with repeatable app practices from my Docker Compose best practices guide and you can move fast without creating a landfill of inconsistent VM builds.
When cicustom is worth the extra complexity
cicustom is what you reach for when the standard fields are no longer enough.
Store it in a snippets-capable storage, then apply it to the clone:
qm set 9101 --cicustom "user=local:snippets/docker-host-user-data.yaml"
This is powerful. It is also where people start making cloud-init feel harder than it is.
My advice: get one normal template working first. Then add cicustom only when you can explain exactly what manual work it is replacing.
If the answer is vague, you probably do not need it yet.
Common mistakes that make cloud-init feel broken
1. Forgetting the cloud-init drive
If ide2 is missing, cloud-init data does not get delivered properly.
You can stare at the cloud-init tab all day. The VM will not care.
2. Setting the wrong boot order
Your disk should usually be first:
qm set 9000 --boot order=scsi0
Otherwise the guest may waste time probing boot devices or behave inconsistently.
3. Baking in too many fixed assumptions
A template should be generic on purpose.
If you embed one specific IP, hostname expectation, or environment-specific hack into the template itself, you are shrinking its usefulness every time you clone it.
4. Assuming static IP failures are cloud-init failures
A lot of them are just networking problems.
Wrong gateway, wrong VLAN, wrong subnet mask, firewall rule mismatch, and bridge confusion all look like “cloud-init did not work” from a distance. They are not the same problem.
5. Treating clones like pets
If every clone gets hand-tuned after boot, your template is not finished.
Improve the source. Rebuild the workflow. Stop rewarding drift.
My default template checklist
Before I call a Proxmox cloud-init template “done,” I want all of this to be true:
official cloud image source documented
QEMU guest agent enabled
SSH key injection working
DHCP boot verified at least once
disk resized appropriately
boot order set correctly
cloud-init drive attached
serial console available
template naming is obvious
first clone tested with a real SSH login
It is a short checklist. It saves a shocking amount of irritation.
FAQ
What is the difference between a Proxmox template and a cloud-init template?
A Proxmox template is the reusable VM base. A cloud-init template is a Proxmox template built from a cloud image and prepared so each clone can receive first-boot customization like username, SSH keys, hostname, and network settings.
Should the workflow uses DHCP or static IPs for Proxmox cloud-init clones?
Start with DHCP unless you have a real reason not to. It is the fastest way to prove the template works. Move to static IPs after you know the clone boots, gets metadata, and accepts your SSH key.
Do I need cicustom for most homelab VMs?
No. It is useful, but it is not the starting point. The built-in Proxmox cloud-init options are enough for a lot of small-lab use cases.
Why is my SSH key not showing up in the clone?
Usually one of three things happened: the key file path was wrong, the cloud-init drive was missing, or the guest image did not process cloud-init the way you expected. Check those before inventing new theories.
Can the workflow uses Debian instead of Ubuntu for this workflow?
Absolutely. Debian cloud images work well. Ubuntu is just a common first choice because the examples and troubleshooting references are everywhere.
What to learn next
Once this workflow is stable, the next smart improvements are not flashy.